Singer
Loading…
F
- FUTURA 4040
- Futura 900
- futura ce-100
- FUTURA CE 1506
- FUTURA CE-2002
- Futura CE-200E
- Futura CE-2504
- FUTURA CE 3504
- Futura II 920
- Futura Quartet
- Futura Quartet FQ-4
- FUTURA QUARTET SEQS-6000
- Futura Quintet 5
- Futura SES20002
- Futura top XL-5000
- Futura XL-4002
- Futura XL-5502
- Futurf II 920
- FW752
G
- G1152
- G1162
- G1172
- G300
- Garment Steamer,SteamWorks Pro
- Genie 353
- Genie 354
- Golden Touch & Sew 620
- Golden Touch & Sew 630
- Golden Touch & Sew 750
- GP
- Graduate 6705
- Graduate II 724
- Grill 3 in 1
- GX-M10
H
- H74
- HA-1
- HAL1200
- harmonie 1002
- HARMONIE 4633
- HARMONY 2662
- HD 1023
- HD 1053
- HD 1104
- HD1711
- HD205 FACILITA PRO
- HD 6335M2
- HE
- Heavy Duty 14HD854
- Heavy Duty 44114
- Heavy Duty 44235
- Heavy Duty 44322
- Heavy Duty 5554
- HG
- HM300
- HM-843
- HM-945
- Household Steam Iron2
I
- IDEA 3
- Imperial 7000
- Imperial 7005
- Improved Family
- Ingenuity 7436
- Inifinity
- Initiale
- Inspiration 4205
- Inspiration 4206
- Inspiration 4210
- Inspiration 4212
- INSPIRATION 4218
- Inspiration 42202
- INSPIRATION 4220 1
- INSPIRATION 42283
- INSPIRATION 4228 1
- IZEK 1500
J
- JUNIOR MISS 67B
K
- K15
- K17
- K18
- K194
- K332
- K38
- K38 Motor
- K42
- K492
- K532
- KB-6002L
- KB-6002LK
- KB-6015K
- KB6525PKRB
L
- L472
- L-5002
- LITTLE TOUCH & SEW 67A
- LOCKSTITCH
- LS2125
- LS-2720
- Luna 1120
M
- M100A
- M 16054
- M 24054
- M.C.P.K. 2504C
Loading…
Loading…
Nothing found
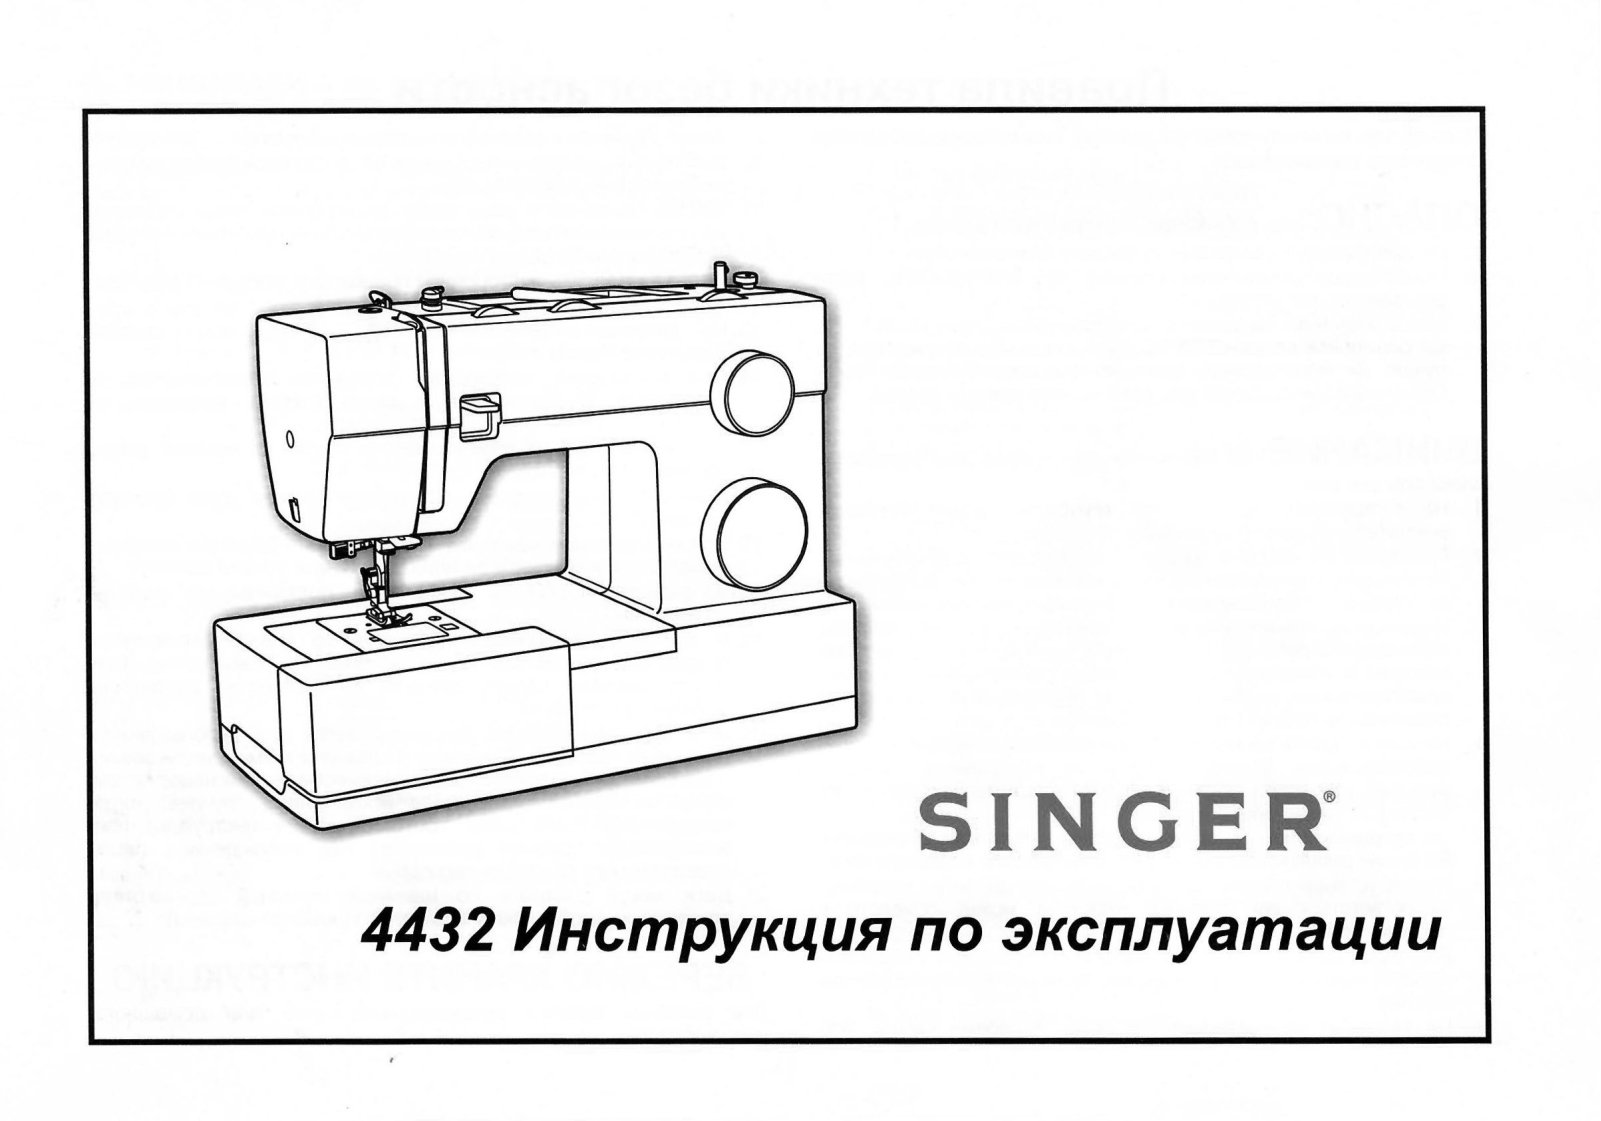
Heavy Duty 4432
operation manual
33 pgs798.6 Kb0
User manual
32 pgs11.58 Mb0
Table of contents
Loading…
…
Singer User manual
Download
Specifications and Main Features
Frequently Asked Questions
User Manual

Loading…
+ 22 hidden pages
You need points to download manuals.
1 point = 1 manual.
You can buy points or you can get point for every manual you upload.
Buy points
Upload your manuals
Singer Heavy Duty 4432
View the manual for the Singer Heavy Duty 4432 here, for free. This manual comes under the category sewing machines and has been rated by 64 people with an average of a 8.7.
This manual is available in the following languages: English. Do you have a question about the Singer Heavy Duty 4432 or do you need help?
Ask your question here
Product Images (8)

Singer Heavy Duty 4432 specifications
Below you will find the product specifications and the manual specifications of the Singer Heavy Duty 4432.
The Singer Heavy Duty 4432 is an automatic sewing machine designed for sewing tasks. It features an automatic needle threader, making it convenient to thread the needle quickly and effortlessly. With its free arm functionality, it allows for easy sewing of cylindrical or small pieces such as sleeves and cuffs.
The 4432 has a one-step buttonhole feature, allowing users to easily create buttonholes in various sizes with just a simple push of a button. It offers variable stitch length, providing flexibility to adjust the stitch length according to different sewing projects.
This machine offers 32 stitch patterns, allowing users to explore various decorative and functional stitch options. With three available needle positions, it provides versatility for different sewing techniques and fabric types.
Operating on electric power, the Singer Heavy Duty 4432 does not include a display. However, it does offer variable stitch width, enabling users to adjust the width of zigzag and decorative stitches according to their preferences.
Constructed with durability in mind, this sewing machine ensures reliability over time. While its design and build quality contribute to its sturdiness, it does not come with any specific display features.
Overall, the Singer Heavy Duty 4432 is an automatic sewing machine suitable for a wide range of sewing tasks. With its automatic needle threader, versatile stitch patterns, and adjustable stitch length and width, it provides users with the necessary tools to complete their sewing projects efficiently and effectively.
Power supply type
Electric
General
| Brand | Singer |
| Model | Heavy Duty 4432 | 4432 |
| Product | sewing machine |
| EAN | 0374318847566 |
| Language | English |
| Filetype | User manual (PDF) |
Features
| Product color | Gray |
| Automatic needle threader | Yes |
| Type | Automatic sewing machine |
| Sewing machine functions | Sewing |
| Free arm | Yes |
| Buttonhole type | 1 Step |
| Number of button holes | 1 |
| Number of programs | — |
| Stitch length | Variable |
| Number of stitch patterns | 32 |
| Number of needle positions | 3 |
| Display | No |
| Stitch width | Variable |
Power
| Power supply type | Electric |
show more
Frequently Asked Questions
Can’t find the answer to your question in the manual? You may find the answer to your question in the FAQs about the Singer Heavy Duty 4432 below.
How to Quickly Repair the Bottom Stitch on Your Singer Heavy Duty 4432
Does the Singer Heavy Duty 4432 have an automatic needle threader?
Yes, the Singer Heavy Duty 4432 has an automatic needle threader. This feature makes it easier for the user to thread the needle, saving time and increasing efficiency.
Why is the machine making strange noises or vibrating excessively?
Check if any part of the machine is loose or not properly attached. Verify that the needle is not hitting the presser foot or any other parts. Ensure that the machine is placed on a stable surface and that it is properly balanced.
How can I troubleshoot thread tension issues?
Start by rethreading the machine, ensuring the thread is correctly passing through all tension disks and guides. Experiment with adjusting the tension dial slightly higher or lower, testing on scrap fabric until balanced tension is achieved. Ensure that the bobbin thread is placed correctly and smoothly wound.
Is the Singer Heavy Duty 4432 an automatic sewing machine?
Yes, the Singer Heavy Duty 4432 is an automatic sewing machine. This means that it has built-in automation features that make sewing tasks easier and more efficient for the user.
Does the Singer Heavy Duty 4432 have a free arm?
Yes, the Singer Heavy Duty 4432 has a free arm. This feature allows the user to easily sew cylindrical items like sleeves and pant legs, making it versatile for a wide range of sewing projects.
Does the Singer Heavy Duty 4432 have a 1-step buttonhole type?
Yes, the Singer Heavy Duty 4432 has a 1-step buttonhole type. This means that it can automatically create buttonholes in just one step, making it convenient and time-saving for the user.
How many stitch patterns does the Singer Heavy Duty 4432 have?
The Singer Heavy Duty 4432 has 32 stitch patterns. This is a relatively high number compared to other sewing machines, providing the user with a wide range of options for different sewing projects.
Why is my needle not picking up the bobbin thread?
Ensure that the needle is inserted correctly and not bent or damaged. Check that the needle is at the highest position and the bobbin is properly threaded. Adjust the tension if necessary.
Why is the machine not sewing smoothly and creating uneven stitches?
Make sure the fabric is properly positioned and the presser foot is securely attached. Check the thread tension to ensure it is balanced. Clean and oil the machine regularly to avoid any thread or lint buildup that might be affecting the stitching.
How can I prevent the fabric from bunching up or getting stuck under the presser foot?
Use the correct type and size of needle for your fabric. Adjust the presser foot pressure to match the thickness of the fabric. Hold the fabric taut as you sew, guiding it evenly through the machine.
What size needle should I use?
Which size of needle you can best use depends on the thickness of the fabric you use. With a thick fabric you should use a thick needle. The packaging of your needle states for which substances your needle is suitable.
Why does the needle break while sewing?
There can be several causes for needle breakage:
— Not using the right needle for the right fabric
— The needle is set too low
— The fabric is not properly guided
— The bobbin case is not inserted correctly
How long does a sewing needle last?
Generally, a sewing needle lasts about 7 to 9 hours.
Is the manual of the Singer Heavy Duty 4432 available in English?
Yes, the manual of the Singer Heavy Duty 4432 is available in English .
Is your question not listed? Ask your question here
Перейти к контенту
Швейные машинки Singer
- Размер инструкции: 11.04 Мб
- Формат файла: pdf
Если вы потеряли инструкцию от швейной машинки Singer Heavy Duty 4432, можете скачать файл для просмотра на компьютере или печати.
Инструкция для швейной машинки Singer Heavy Duty 4432 на русском языке. В руководстве описаны возможности и полезные функции, а также правила эксплуатации. Перед использованием внимательно ознакомьтесь с инструкцией.
Чтобы не читать всю инструкцию вы можете выполнить поиск по содержимому внутри инструкции и быстро найти необходимую информацию. Рекомендации по использованию помогут увеличить срок службы швейной машинки Singer Heavy Duty 4432. Если у вас появилась проблема, то найдите раздел с описанием неисправностей и способами их решения. В нем указаны типичные поломки и способы их решения.
- July 4, 2024
- Singer
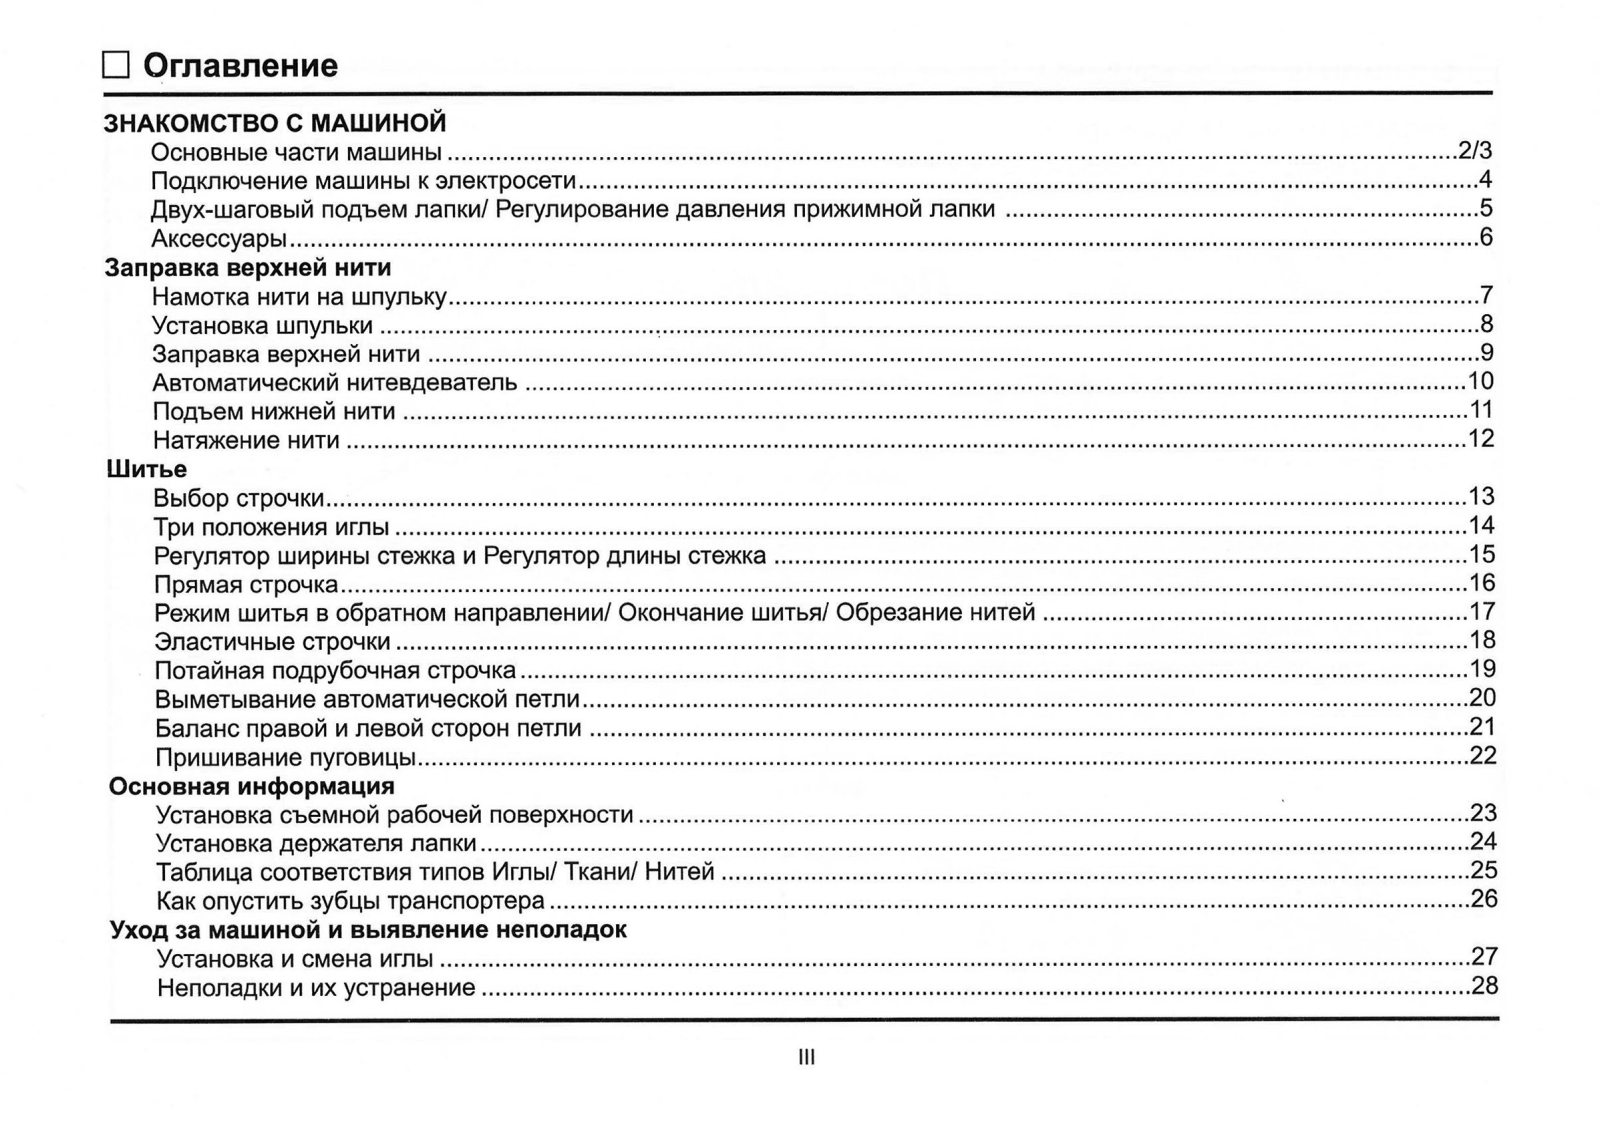
Table of Contents
- SINGER 4432 Heavy Duty Sewing Machine
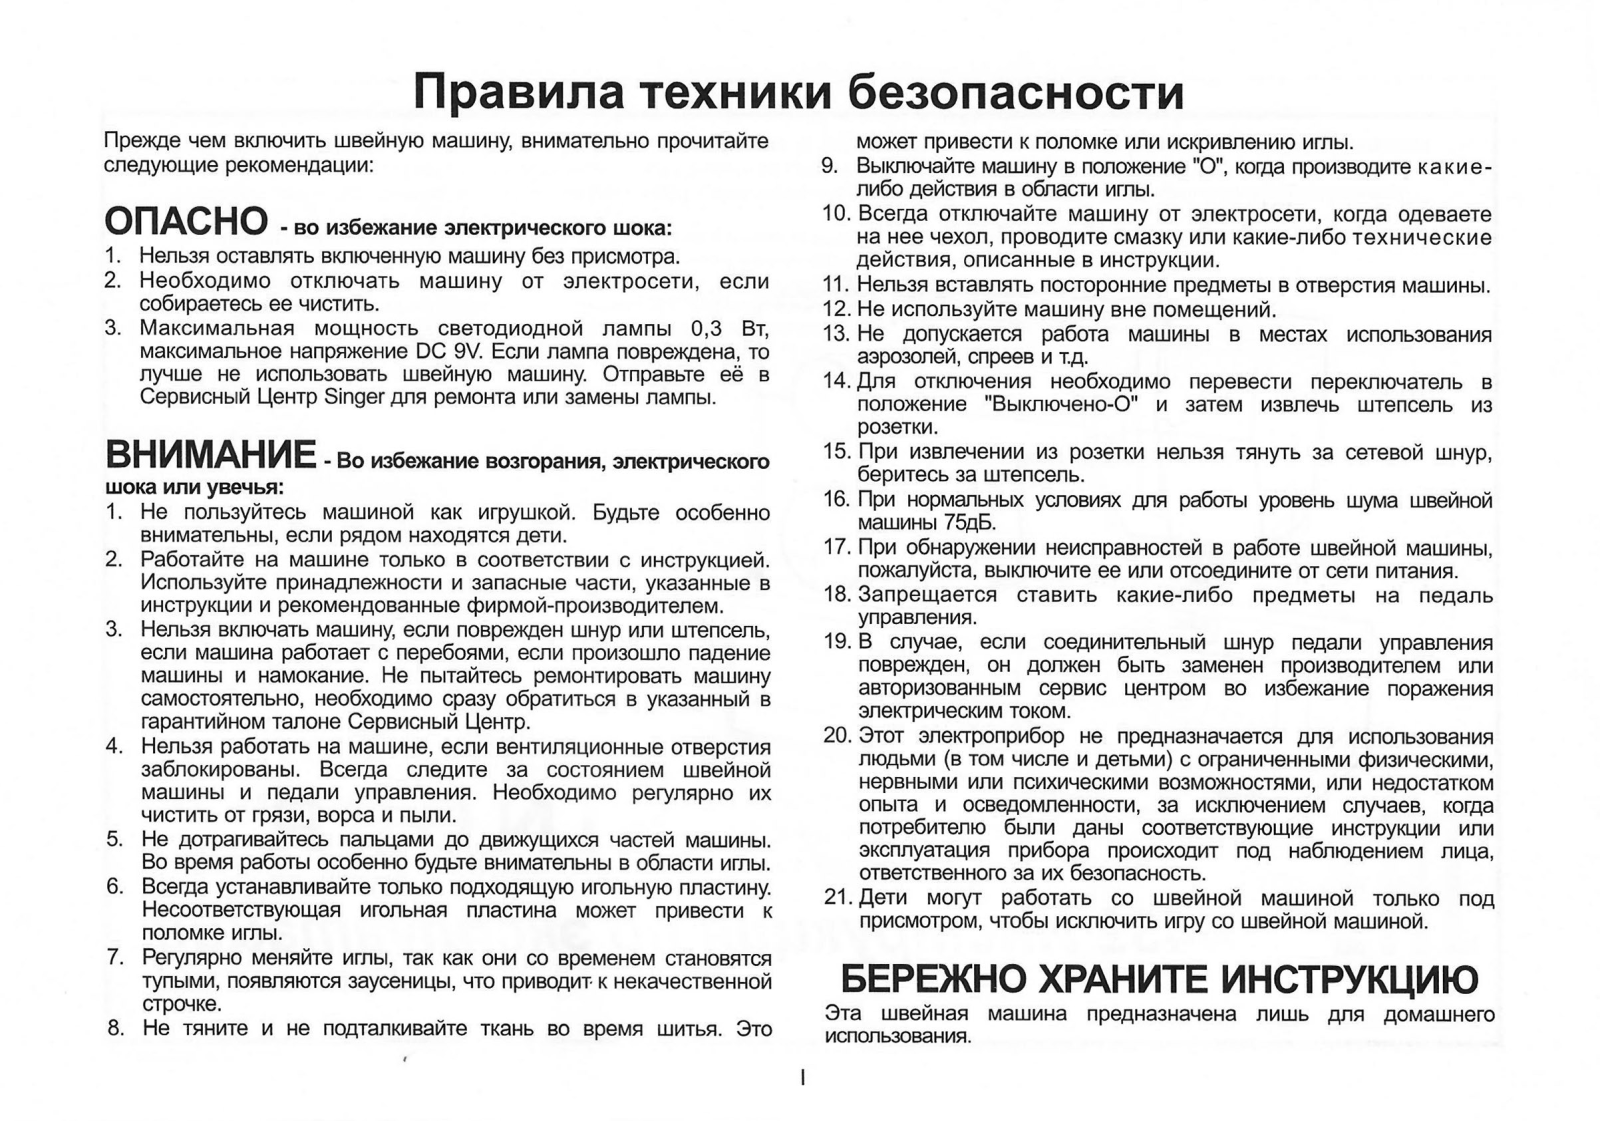
- IMPORTANT SAFETY INSTRUCTIONS
- Principal Parts of the Machine
- Connecting Machine to Power Source
- Two-Step Presser Foot Lifter
- Accessories
- Winding the Bobbin
- Threading the Upper Thread
- Thread Toncinn
- How to Choose Your Pattern
- Three Needle Position Dial
- Stitch Width Dial & Stitch Length Dial
- Sewing Straight Stitch
- Choosing Stretch Stitch Patterns
- Sew 1-step Buttonholes
- Sewing on Buttons
- Installing the Removable Extension Table
- Attaching the Presser Foot Shank
- Needle/ Fabric/ Thread Chart
- How To Drop Feed Dog
- Inserting & Changing Needles
- Troubleshooting Guide
- FAQs
- Video-SINGER 4432 Heavy Duty Sewing Machine
- Read User Manual Online (PDF format)
- Download This Manual (PDF format)

SINGER 4432 Heavy Duty Sewing Machine

IMPORTANT SAFETY INSTRUCTIONS
When using an electrical appliance, basic safety should always be followed,
including the following:
Read all instructions before using this sewing machine.
DANGER
To reduce the risk of electric shock:
- An appliance should never be left unattended when plugged in.
- Always unplug this appliance from the electric outlet immediately after using and before cleaning.
- The LED lamp maximum power is 0.3W, maximum voltage is DC 9V. If the lamp is damaged, you should not use the product, send it to SINGER or a service agent to repair or replace at once.
WARNING – To reduce the risk of burns, fire, electric shock, or injury to
persons:
- Do not allow to be used as a toy. Close attention is necessary when this appliance is used by or near children.
- Use this appliance only for its intended use as described in this manual. Use only attachments recommended by the manufacturer as contained in this manual.
- ever operate this appliance if it has a damaged cord or plug, if it is not working properly, if it has been dropped or damaged, or dropped into water. Return the appliance to the nearest authorized dealer or service center for examination, repair, Center for examination, rapes electrical or mechanical adjustment.
- Never operate the appliance with any air openings blocked. Keep ventilation openings of the sewing machine and foot controller free from accumulation of lint, dust, and loose cloth. 5. Keep fingers away from all moving parts. Special care is required around the sewing machine needle.
- Always use the proper needle plate. The wrong plate can cause the needle to break.
- Do not use bent needles.
- Do not pull or push fabric while stitching. It may deflect the needle causing it to break.
- Switch the sewing machine off (“O”) when making any adjustments in the needle area, such as threading needle, changing needle, threading bobbin, or changing presser foot, and the like.
- Always unplug sewing machine from the electrical outlet when removing covers, lubricating, or when making any other user servicing adjustments mentioned in the instruction manual.
- Never drop or insert any object into any opening.
- Do not use outdoors.
- Do not operate where aerosol spray products are being used or where oxygen is being administered.
- To disconnect, turn all controls to the off (“O”) position, then remove plug from outlet.
- Do not unplug by pulling on cord. To unplug, grasp the plug, not the cord.
- The sound pressure level under normal operating conditions is 75dB(A).
- Please turn off the machine or unplug when the machine is not operating properly.
- ever place anything on the foot controller.
- If the supply cord that is fixed with foot controller is damaged, it must be replaced by the manufacturer or its service agent or a similar qualified person in order to avoid a hazard.
- This appliance is not intended for use by persons (including children) with reduced physical, sensory or mental capabilities, or lack of experience and knowledge, unless they have been given supervision or instruction concerning use of the appliance by a person responsible for their safety.
- Children should be supervised to ensure that they do not play with the appliance.
SAVE THESE INSTRUCTIONS
This sewing machine is intended for household use only.
Congratulations
As the owner of a new SINGER sewing machine, you are about to begin an
exciting adventure in creativity. From the moment you first use your machine,
you will know you are sewing on one of the easiest to use sewing machines ever
made.
May we recommend that, before you start to use your sewing machine, you
discover the many features and the ease of operation by going through this
instruction book, step by step, seated at your machine.
To ensure that you are always provided with the most modern sewing
capabilities, the manufacturer reserves the right to change the appearance,
design or accessories of this sewing machine when considered necessary. SINGER
is the exclusive trademark of The Singer Company Limited S.à.r.l. or its
Affiliates. ©2013 The Singer Company Limited S.à.r.l. or its Affiliates. All
rights reserved.
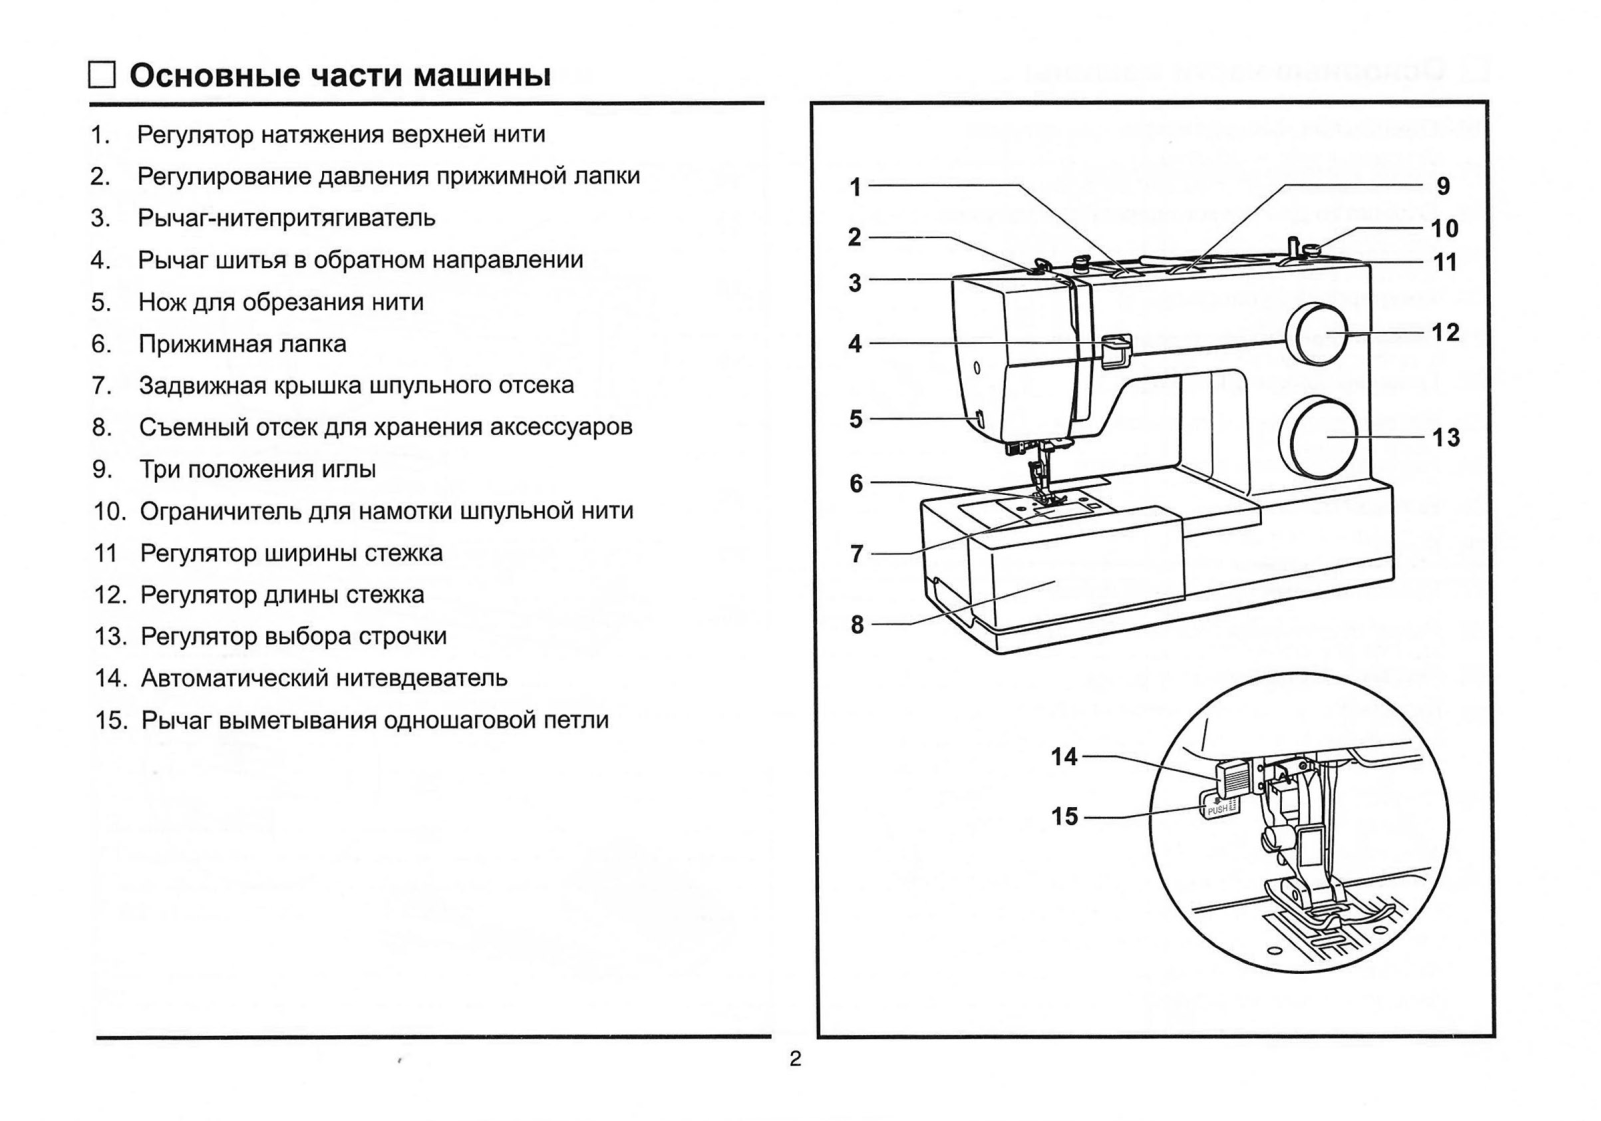
Principal Parts of the Machine
- Thread tension dial
- Presser foot pressure adjustment
- Thread take-up lever
- Reverse sewing lever
- Thread cutter
- Presser foot
- Needle plate cover
- Removable extension table/ accessory storage
- Three-needle position dial
- Bobbin stopper
- Stitch width dial
- Stitch length dial
- Pattern selector dial
- Automatic threader
- One step buttonhole lever
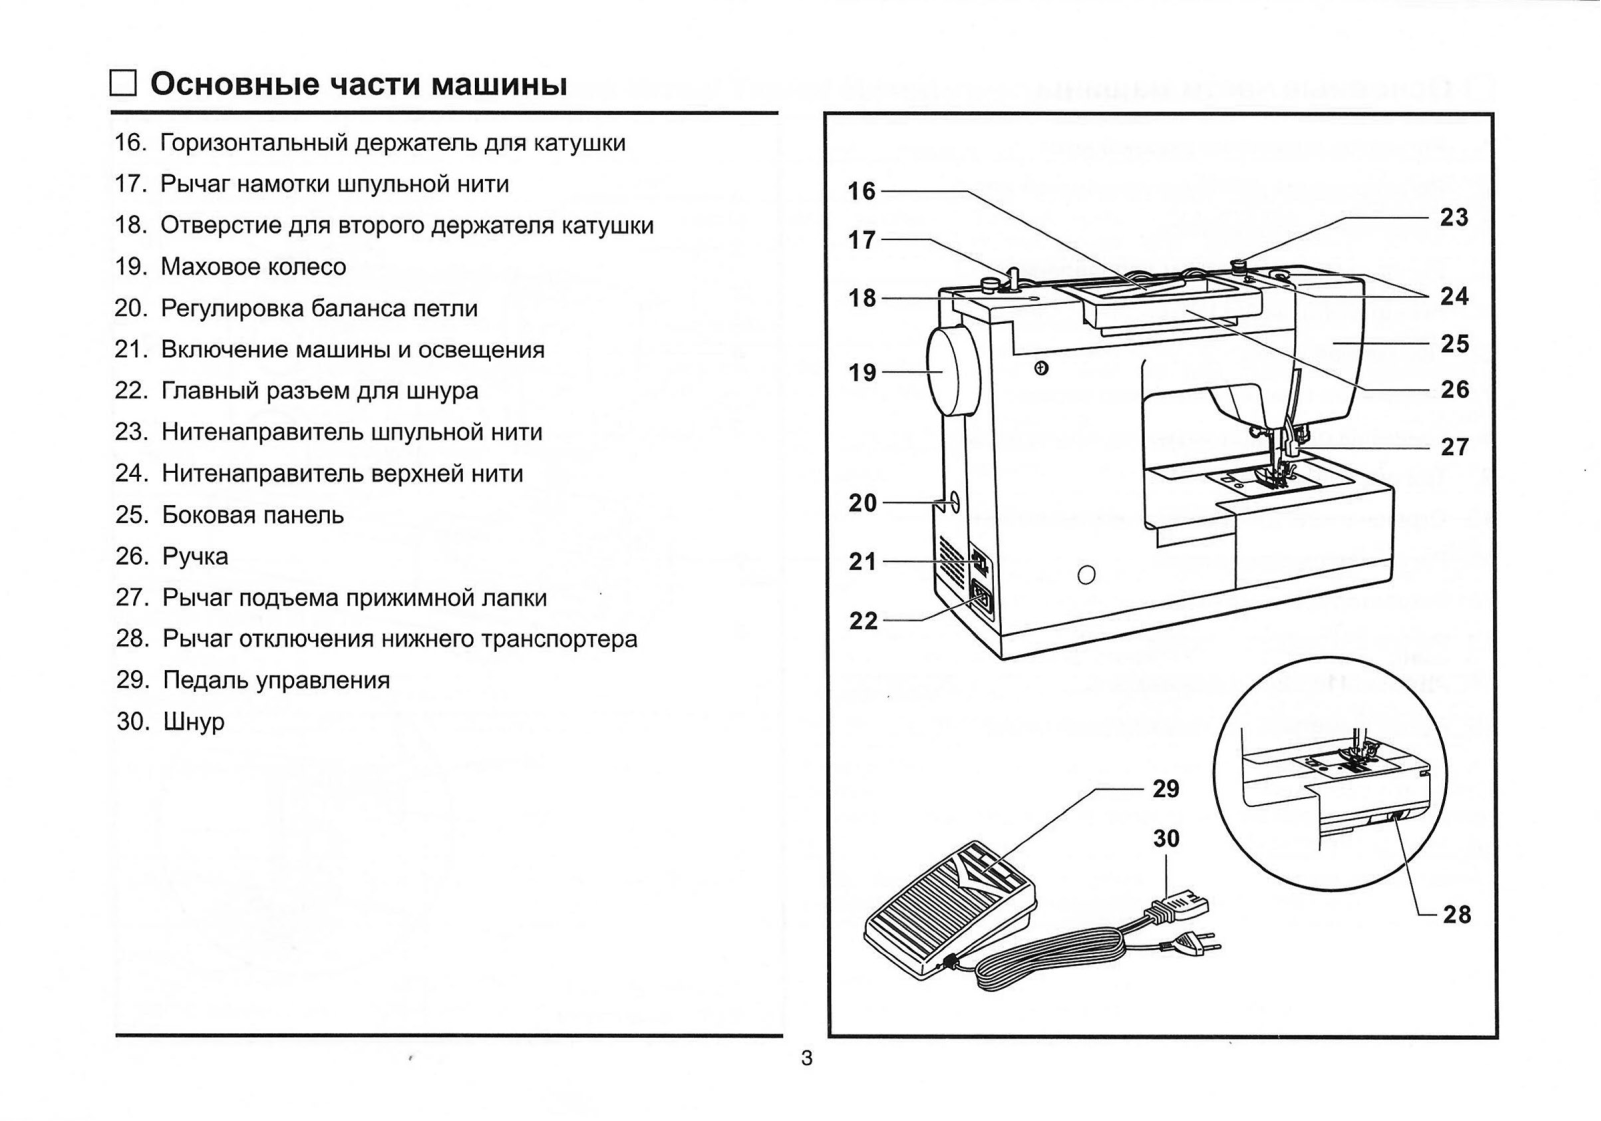
- Horizontal spool pin
- Bobbin winding spindle
- Hole for auxiliary spool pin
- Handwheel
- Buttonhole stitch balance adjustment slot
- Power and light switch
- Main plug socket
- Bobbin thread guide
- Upper thread guide
- Face plate
- Handle
- Presser foot lifter
- Drop feed control
- Foot speed control
- Power cord
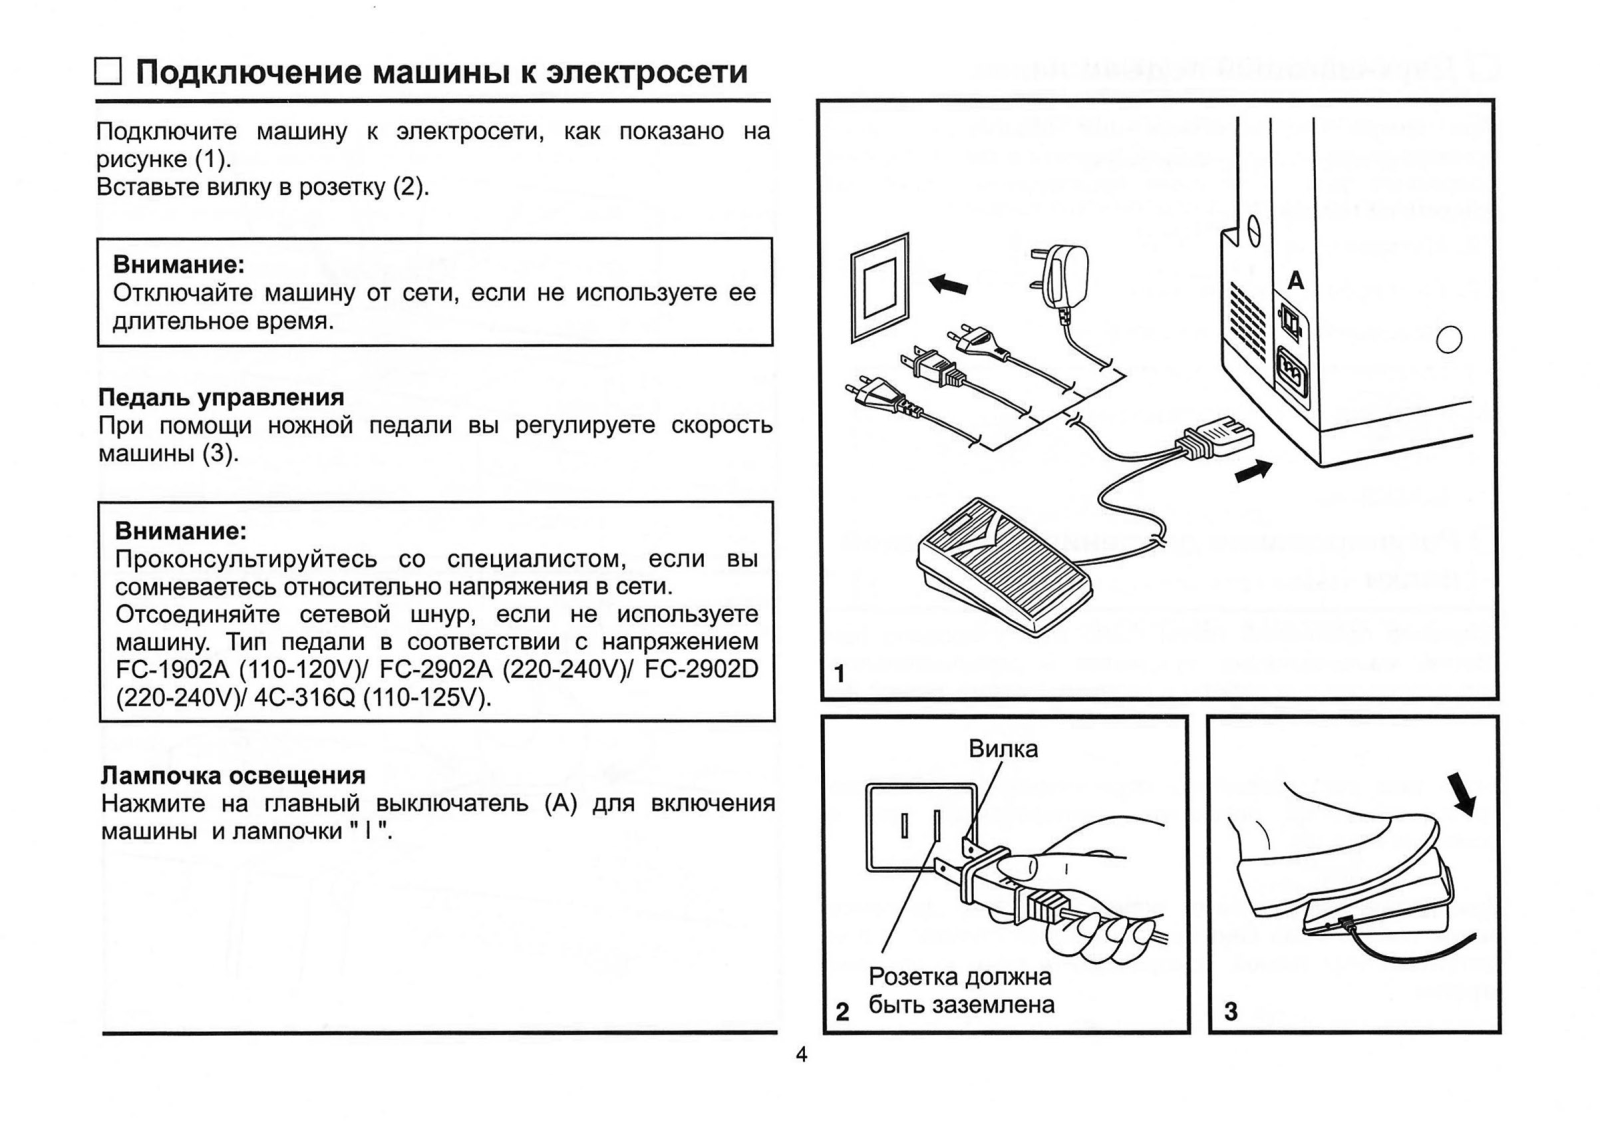
Connecting Machine to Power Source
Connect the machine to a power source as illustrated. (1)

This appliance is equipped with a polarized plug which must be used with the
appropriate polarized outlet. (2)
Attention:
Unplug the power cord when the machine is not in use.
Foot control
The foot control pedal regulates the sewing speed. (3)
Attention:
Consult a qualified electrician if in doubt of connecting the machine to the
power source.
Unplug the power cord when the machine is not in use. The foot control must be
used with the appliance by FC- 1902A (110-120V area)/ FC-2902A (220-240V
area)/ 4C- 316Q (110-125V area).
Sewing light
Press the main switch (A) to “|” for power and light.
IMPORTANT NOTICE
For appliances with a polarized plug (one blade is wider than the ted lo in a
polarized way this does not fit fully in the outlet, reverse the plug. If it
still does not fit, contact a qualified electrician to install the proper
outlet. Do not modify the plug in any way.
- Polarized attachment plug
- The conductor intended to be grounded
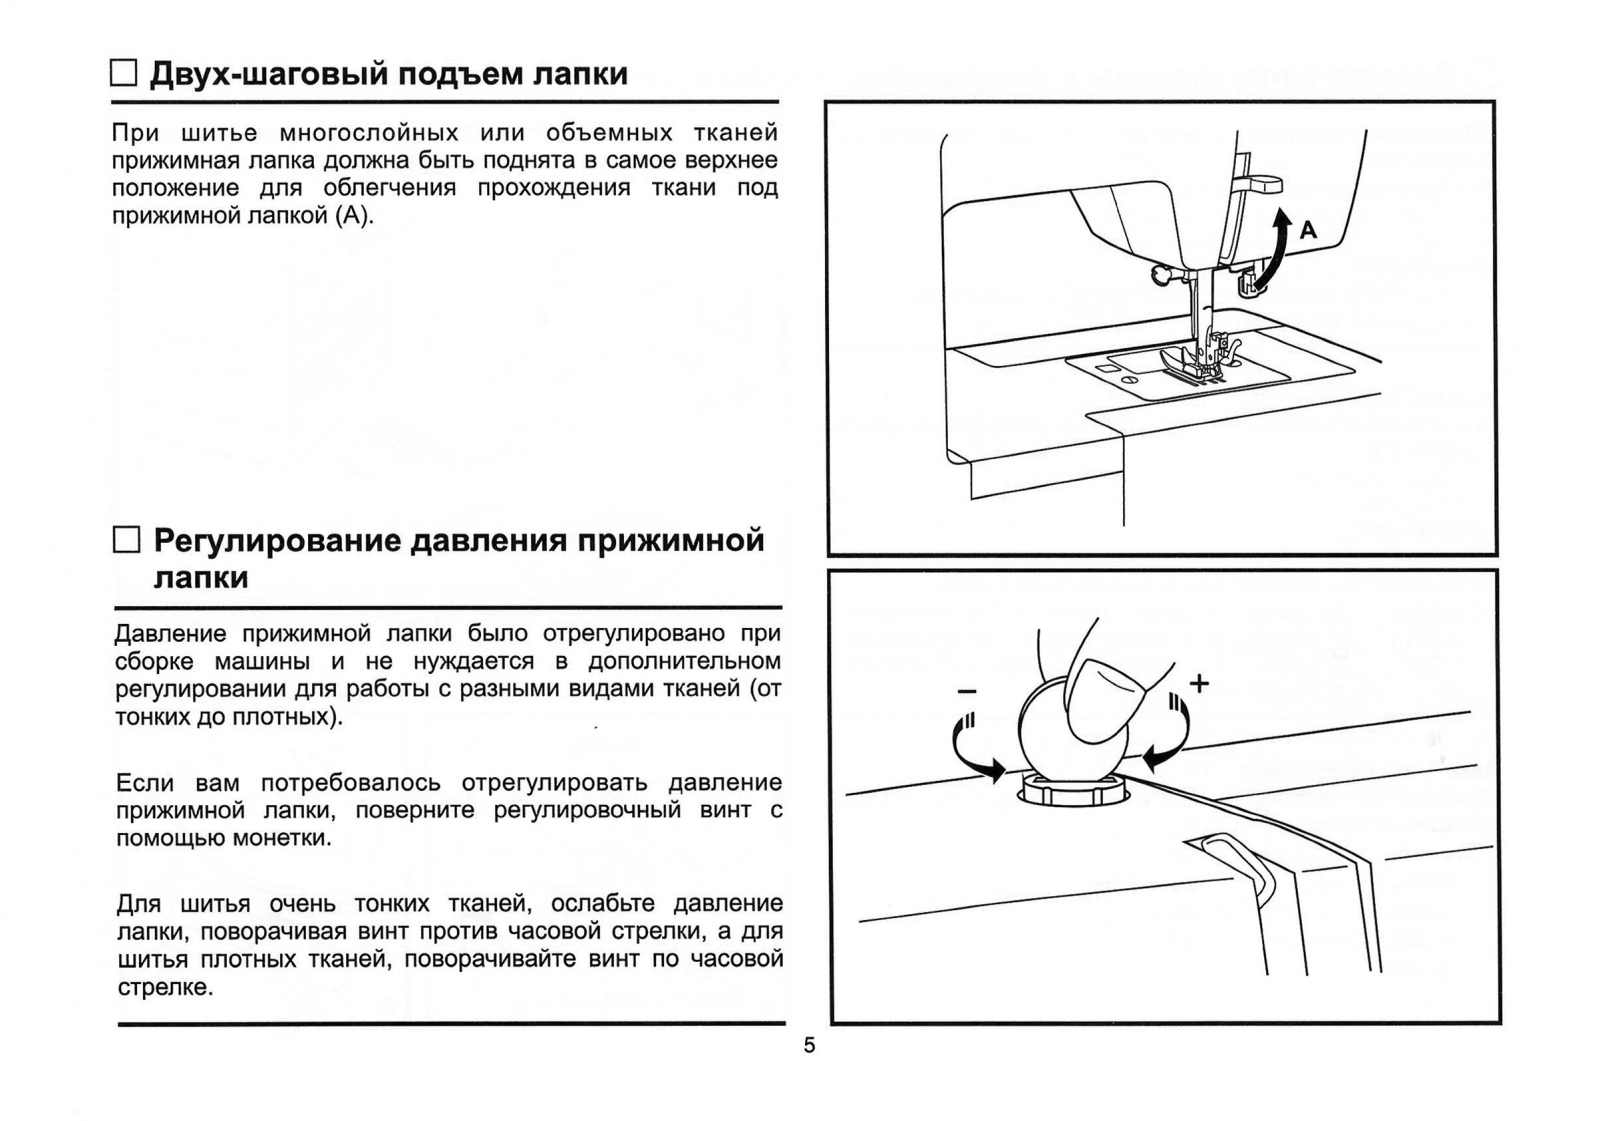
Two-Step Presser Foot Lifter
When sewing several layers of thick fabrics, the presser foot can be raised to
a higher position for easy positioning of the work. (A)
The presser foot will remain raised as long as you hold up the presser foot
lifter. As soon as you release it, the presser foot will drop back down to the
intermediate position.

Adjusting Presser Foot Pressure
The presser foot pressure of the machine has been pre-set and requires no
particular readjustment according to the type of fabric (light or heavy
weight).
However, if you need to adjust the presser foot pressure, turn the presser
adjusting screw with a coin.
For sewing, very thin fabric, loosen the pressure by turning the screw
counterclockwise, and for heavy fabric, tighten by turning it clockwise.
It is suggested that you turn the screw in one-quarter-inch increments so that
it can be easily reset to factory settings.
Accessories
Standard accessories (1)
-
a. All-purpose foot
-
b. Zipper foot
-
c. Buttonhole foot
-
d. Button sewing foot
-
e. Seam ripper/ brush
-
f. Edge/ quilting guide
-
g. Pack of needles
-
h. Spool holders (2x)
-
i. Bobbin (3x)
-
j. L-screwdriver
-
k. Auxiliary Spool Pin
-
l. Spool pin felt
-
m. Softcover
Optional accessories (2)
These 10 accessories are not supplied with this machine; they are, however,
available for purchase from your authorized retailer.) -
n. Satin stitch foot
-
o. Overcasting foot
-
p. Hemmer foot
-
q. Cording foot
-
r. Blind hem foot
-
s. Quilting/ straight stitch foot
-
t. Gathering foot
-
u. Darning/ embroidery foot
-
v. Even Feed foot
-
w. Twin needle
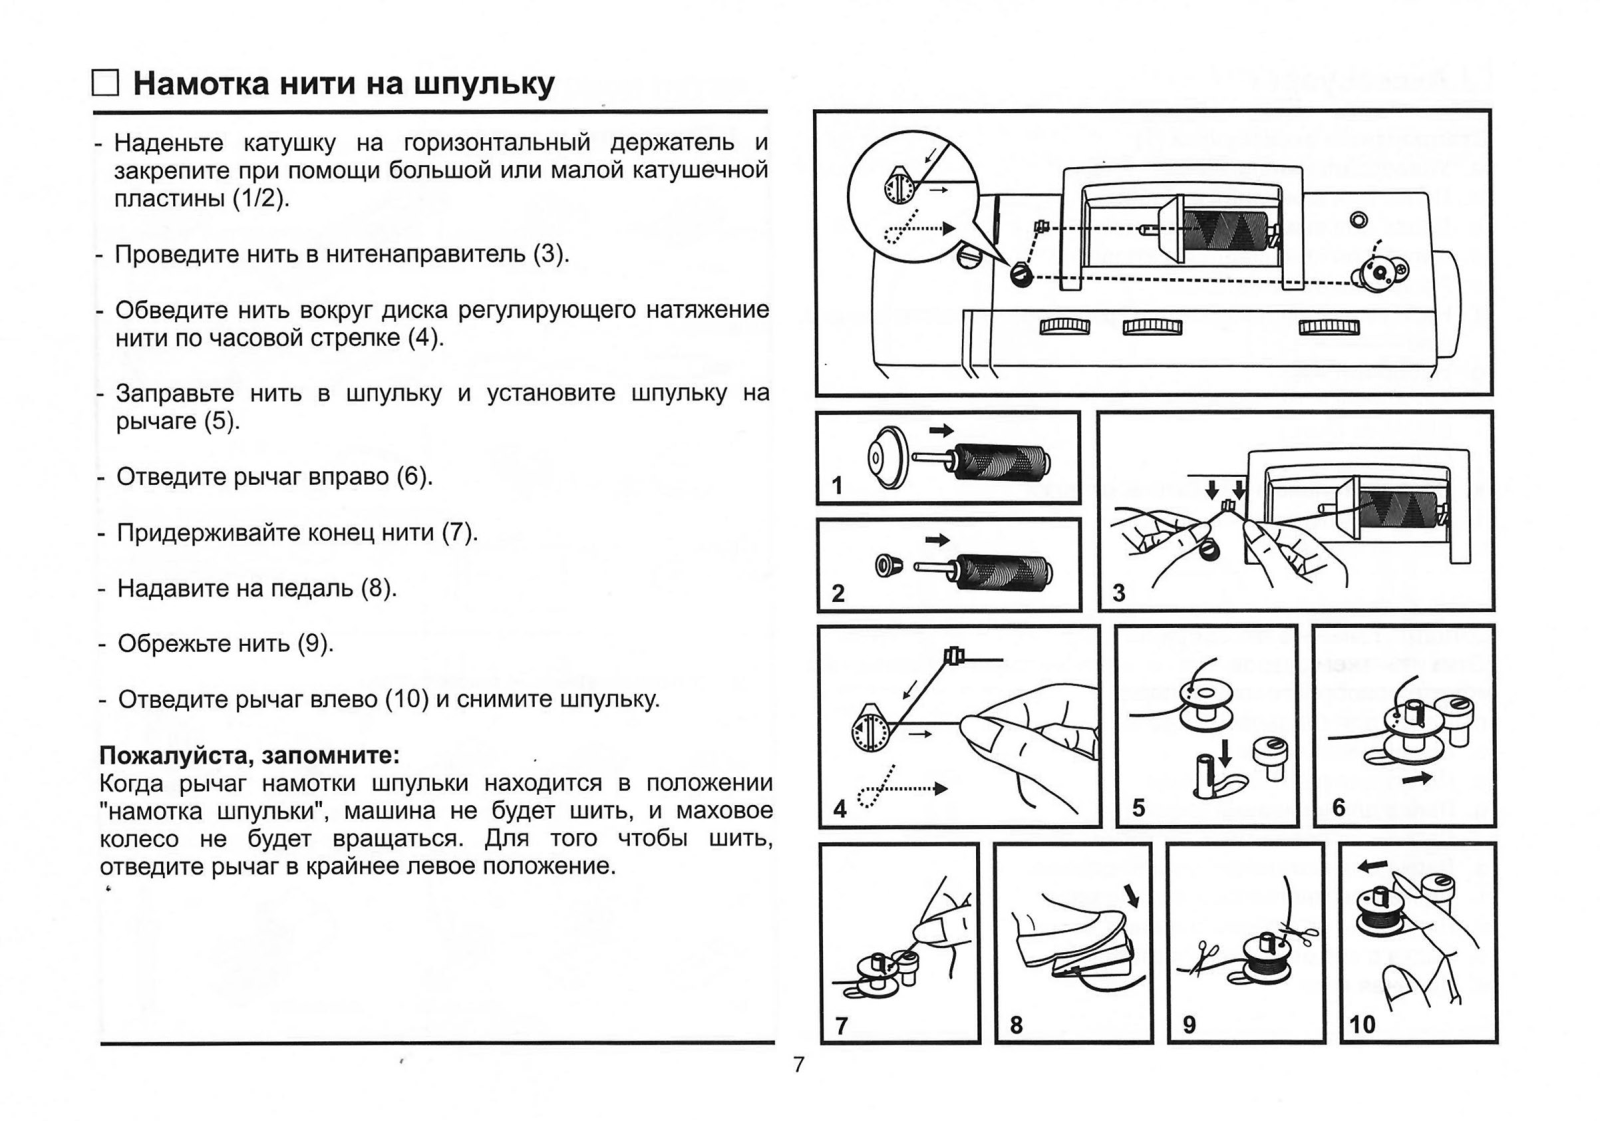
Winding the Bobbin

- Place thread and corresponding spool holder onto to spool pin. (1/2)
- Snap thread into thread guide. (3)
- Wind thread clockwise around bobbin winder tension discs. (4)
- Thread bobbin as illustrated and place on spindle. (5)
- Push the bobbin spindle to the right. (6)
- Hold thread end securely. (7)
- Step on the foot control pedal. (8)
- Trim thread close to the bobbin & then continue windinguntil the bobbin is full. (9)
- Cut thread, push bobbin spindle to left (10), and remove.
Please Note:
When the bobbin winder spindle is in the “bobbin winding” position, the
machine will not sew, and the handwheel turn.
To start sewing, push the bobbin winder spindle to the left (sewing position).


Inserting the Bobbin
When inserting or removing the bobbin, raise the presser foot & make sure the
needle is fully raised.


- Remove the bobbin cover plate by pushing the small tab to the right of the cover towards the right.
- Insert the bobbin in the bobbin case with the thread running counterclockwise direction (arrow).
- Pull the thread through the slit (A).
- Draw the thread clockwise until it slips into the notch (B), while holding the bobbin down with the tip of your finger.
- Pull out about 15 cm (6 inches) of thread towards the back of the plate and attach the bobbin cover plate. (C)
Attention:
Turn the power switch to off (“O”) before inserting or removing the bobbin.
Threading the Upper Thread
This is a simple operation but it is important to carry out correctly as by
not doing so.


-
Start by raising the needle to its highest point (1), and continue turning the handwheel* counterclockwise until the needle just slightly begins to descend. You must raise the presser foot to release the tension discs.
Note:
For safety, it is strongly suggested you turn off the power before
threading. -
Lift up the spool pin. Place the spool of thread on the holder with the thread coming off the spool from the back as shown and place appropriate spool holder next to the spool. For small thread spools, place small side of spool holder next to spool. (2)
-
Draw thread from spool through the upper thread guide (3) and pulling thread through the pre-tension spring as illustrated. (4)
-
Thread tension module by leading thread down right channel. (5) During this process it is helpful to hold the thread between the spool and thread guide, as this will help to seat the thread between the tension discs.
-
At the top of this movement pass thread from right to left through the slotted eye of the take-up lever and then downwards again. (6)
-
ow pass the thread behind the horizontal thread guide, and then behind the thin wire needle clamp guide (7) and then down to the needle which should be threaded from front to back.
-
Pull about 6 – 8 inches of thread under the presser foot to the rear beyond the needle eye. Trim thread to length with built-in thread cutter. (8)
-
Never turn the handwheel away from you as this may cause the timing to be disrupted. Always turn the handwheel counterclockwise (towards you).
Automatic Needle Threader


- Thread upper tension of machine up to the thin wire in front of the needle clamp.
- Raise the needle to its highest position.
- Set the Pattern Selector Dial (see item # 13 on page 2 of the manual) to Straight Stitch.
- Set Stitch Width Dial (see item # 11 on page 2 of the manual) to “0”.
- Set Three Needle Position Dial (see item # 9 on page 2 of the manual) to center position.
- Lower the needle threader (A) as far down as it will go, then push it back gently so that the hook inside the threader will slip into the eye of the needle.
- The threader automatically swings to the threading position (B).
- Pass the thread under thread guide (C), from left to right.
- Pass the thread in front of the needle around the hook (D) from bottom to top.
- Release lever (A), by swinging it away from you & then pushing it back up to the resting position.
- Pull the thread through the needle eye.
Attention:
Turn the power switch to off (“O”)!
The needle threader is designed to work best with a size 14 needle. Your
machine is equipped with a standard size 14 needle at the factory.
Raising the Bobbin Thread


Hold the upper thread with the left hand. Turn the handwheel (1) towards you
(counterclockwise) lowering, then raising the needle.
Note:
- If it is difficult to raise the bobbin thread, check to make sure the thread is not trapped by the hinged cover or the Removable Extension Table.
- Gently pull on the upper thread to bring the bobbin thread up through the needle plate hole. (2)
- Lay both threads to the back under the presser foot. (3)
Thread Toncinn


Upper thread tension
Basic thread tension setting: “4”. (1)
To increase the tension, turn the dial to the next number up.
To reduce the tension, turn the dial to the next number down.
- A. Normal thread tension for straight stitch sewing.
- B. Thread tension too loose for straight stitch sewing. Turn dial to higher number.
- C. Thread tension too tight for straight stitch sewing. Turn dial to lower number.
- D. Normal thread tension for zig zag and decorative sewing.
- Correct thread tension is when a small amount of the upper thread appears on the bottom side of fabric. If the thread is looping or birdnesting on the underside of the fabric, this is an indication that the upper machine tension is not threaded correctly.
Lower thread tension
The bobbin tension has been set correctly at the factory, so you do not need
to adjust it.
Please note:
- Proper tension setting is important for strong seams.
- There is no single tension setting appropriate for all stitch functions, thread or fabric.
- A balanced tension (identical stitches both top and bottom) is usually only desirable for straight stitch construction sewing.
- 90% of all sewing will be between “3” and “5”.
- For zig zag and decorative sewing stitch functions, thread tension should generally be less than for straight stitch sewing.
- For all decorative sewing you will always obtain a nicer stitch and less fabric puckering when the upper thread appears on the bottom side of your fabric.
- If the thread is looping or birdnesting on the top of the fabric, this is an indication that the bobbin thread has not been threaded correctly.
How to Choose Your Pattern


The diagram on this page displays the stitch patterns available on the
machine.
Stitches in the top of the diagram are indicated on the pattern selector dial
in gray. To select the patterns indicated with the gray color, turn the
pattern selector dial. (e)
For top row stitches B, C, D, E, I, J, and K follow these steps:
-
Set the Three Needle Position Dial (b) to the Center.
-
Set the Stitch Width Dial (c) to 6. This will give you the widest stitch. If you would like a narrower stitch, set the Stitch Width Dial to between 1 and 5.
-
Set the Stitch Length Dial (d) to 2. You can adjust the density by moving the Stitch Length Dial to 1 to make the stitching closer, or towards 4 to make it longer.
For top row stitches F, G, and H follow these steps: -
Set the Three Needle Position Dial (b) to the Center.
-
Set the Stitch Width Dial (c) to 6. This will give you the widest stitch. If you would like a narrower stitch, set the Stitch Width Dial to between 1 and 5.
-
Set the Stitch Length Dial (d) to 1. You can adjust the density by moving the Stitch Length Dial to 0.5 to make the stitching closer.
Further instructions for setting the stitch width & the stitch length dials
can be found on page 28.
To obtain the other patterns, turn the stitch length dial to “S1” or “S2”,
select the pattern desired with pattern selector dial, and adjust the stitch
width with the stitch width dial.
The pattern selector dial may be turned in either direction.
- a. Reverse sewing lever
- b. Three needle position dial
- c. Stitch width dial
- d. Stitch length dial
- e. Pattern selector dial
Three Needle Position Dial
The needle position can be altered with the “Three needle position dial”. For
normal work, the needle position in the middle. For edge stitching or sewing
parallel lines of topstitching, select needle position left or right. For twin
needle stitching, needle position is middle.
In order to set the Three Needle Position Dial (See item # 9 on page 2 of the
manual) to the left, in the center or to the right, the Stitch Width Dial must
be set to “0” position.
- a. Straight
- b. Zig-zag
- L. Left Needle Position
- M. Middle Needle Position
- R. Right Needle Position
Stitch Width Dial & Stitch Length Dial

The function of stitch width dial
When doing a zig zag or a decorative pattern you can alter the width from 1mm
to 6mm. To obtain a very narrow stitch, set the dial to 1, to obtain the
maxinum 6mm width, set the dial to 6. When the dial is set to 0, you will
obtain a straight stitch. (1)
The stitch width dial (see item # 11 on page 2 of your manual) is also the
control for the straight stitch infinite needle position. To use this function
your Pattern Selector Dial (see item # 13 on page 2 in the manual) must be set
at Straight Stitch. For an infinite needle position, first set the Three
Needle Position Dial so that the needle is positioned to the right and then by
moving the stitch width dial between “0” and “6”, you can position the needle
where you require it.
Function of stitch length dial while zig-zag stitching
Set the pattern selector dial to zig zag or any other decorative pattern.
The density of zig zag or decorative stitches increases as the setting of the
stitch length dial approaches “0”. The smaller the number the closer, or
denser the stitches will be.
Standard zigzag stitches are usually achieved at “3” or below. (2) Dense zig-
zag stitches are called satin stitches. (2)
Function of stitch length dial for when straight stitching
For straight stitch sewing, turn the Pattern Selector Dial to the straight
stitch setting. Turn the Stitch Length Dial, and the length of the individual
stitches will decrease as the dial approached “0”. The length of the
individual stitches will increase as the dial approaches “4”. Generally
speaking, use a longer stitch length when sewing heavier weight fabrics or
when using a thicker needle or thread. Use a shorter stitch length when sewing
lighter weight fabrics or when using a finer needle or thread.
- The standard setting for sewing a seam is between 2 and 3.
- For basting purposes, set the stitch length all the way to 4 (longest).
Sewing Straight Stitch

To begin sewing, set the machine for a straight stitch. (1)
Set the stitch length to between 2 and 3.
Place the fabric under the presser foot with the fabric edge lined up with the
desired seam guide line on the needle plate. (2)
Lower the presser foot lifter, and then step on the foot controller to start
sewing. (3)
-
Reverse Sewing
To secure the beginning and the end of a seam, press down the reverse sewing
lever (A). Sew a few reverse stitches.
Release the lever and the machine will sew forward again. (1) -
Removing the Work
Turn the handwheel toward you (counterclockwise) to bring the thread take up
lever to its highest position, raise the presser foot and remove work behind
the needle and presser foot. (2) -
Cutting the Thread
Pull the threads under and behind the presser foot. Guide the threads to
the side of the face plate and into thread cutter (B). Pull threads down to
cut. (3)

Choosing Stretch Stitch Patterns
The stretch stitch patterns are indicated with blue and red colors on the
pattern selector dial. To select these stitches, turn the pattern selector
dial to the desired pattern. Then, turn the stitch length dial to the
indicator marked “S1” or “S2”.
Though there are severall stretch patterns, here are two examples:


Straight Stretch Stitch (1)
Set the pattern selector dial to .
Set the stitch width dial to “1”.
Used to add triple reinforcement to stretch and hardwearing seams.
The machine sews two stitches forward and one stitch backwards.
Ric Rac (2)
Set the pattern selector dial to ” ”
Set the stitch length dial to “S1” or “S2”.
Adjust the stitch width dial to between “3” and “6”.
Ric rac stitch is suitable for firm fabrics like denim, corduroy, poplin,
duck, etc.
Blind Hem

For hems on curtains, trousers, skirts, etc.
Blind hem for stretch fabrics.
Blind hem for firm fabrics. Set the stitch length dial with the range shown on
the diagram at the right. Blind hems, however, are normally sewn with a longer
stitch length setting. Set the stitch width dial at a setting appropriate for
the weight/type of fabric being sewn, within the range shown in the diagram on
the right of the pares, and al Wider stron is sitch is header weight fabrich.
Sew a test first to make sure the machine settings are appropriate for the
fabric.
Blind Hem:
Turn up the hem to the desired width and press. Fold back (as shown in Fig. 1)
against the right side of the fabric with the top edge of the hem extending
about 7 mm (1/4″) to the right side of the folded fabric.
Start to sew slowly along the fold, so that the needle drops through the edge
of the fold. (2)
Unfold the fabric when hemming is completed and press.
Note:
To make blind hem sewing even easier, use a blind hem foot, available from
your SINGER® retailer. (See page 10 for part number)
Sew 1-step Buttonholes


Buttonhole sewing is a simple process that provides reliable results. It is
strongly suggested to always make a test buttonhole on a sample of your fabric
before working on your garment. Stabilizer should alsways be used when making
buttonholes.
Making a Buttonhole
Making a Buttonhole on Stretch Fabrics (E)
- Using tailor’s chalk, mark the position of the buttonhole on the fabric.
- Attach the buttonhole foot and set the Pattern Selector Dial to ” “. Set stitch length dial to ” “. Set the stitch width at “6”. The width however may need to be adjusted according to the project. Sew a test first to determine this.
- Lower the presser foot aligning the marks on foot with the marks on the fabric (A). (The front bar tack will be sewn first.) (Align the mark on the fabric (a) with the mark on the foot (b).)
- Open the button plate and insert the button (B).
- Lower the buttonhole lever and gently push it back (C).
- While lightly holding the upper thread, start the machine.
- Buttonhole stitching is done in the order (D).
- Stop the machine when the buttonhole cycle has completed.
Making a Buttonhole on Stretch Fabrics (E)
When sewing buttonholes on stretch fabric, hook-heavy thread or cord under the
buttonhole foot. When the buttonhole is sewn the legs will overcast the cord.
-
Mark the position of the buttonhole on the fabric with the tailor’s chalk, attach the buttonhole foot, and set the pattern selector dial to ” “. Set stitch length dial to ” “.
-
Hook the heavy thread onto the back end of the buttonhole foot, then bring the two heavy thread ends under & to the front of the foot, insert them into the grooves, and temporarily tie them there.
-
Lower the presser foot and start sewing.
Set the stitch width to match the diameter of the gimp thread. -
Once sewing is completed, gently pull the heavy thread to remove any slack, then trim off the excess.
Left and Right Side Balance for Buttonhole

Stitch density on right and left sides of buttonhole can be adjusted by
buttonhole balance control dial.
This dial should usually be in a neutral position (between “+” and ” “)
If the stitches on the left side of buttonhole are too close vtogether, turn
the dial to the left (+).
-
Turning dial to the left opens left side.
If the stitches on the left side of the buttonhole are too open, turn the dial
to the right (-). -
Turning dial to right closes left side.
Sewing on Buttons

Move the drop feed control to right side to lower the feed dogs. (1)
Change the all purpose foot to the button sewing foot. (2)
Set the stitch length to “0”.
Place the button and fabric under the Button Sewing foot, as illustrated in
(3).
Set the machine for zig-zag stitch, then set the width to number “3” – “6”.
Turn the handwheel to check that the needle goes cleanly into the left and
right holes of the button. Adjust the stitch width, as needed, according to
the distance between the holes of the button. Slowly sew on the button with
about 10 stitches.
Raise the needle out of the fabric. Set the machine for straight stitch again,
then sew a few securing stitches to finish.
If a shank is required, place a darning needle on top of the button and sew.
For buttons with 4 holes, sew through the front two holes first, push the work
forward and then sew through the back two holes.
Installing the Removable Extension Table

- Hold the removable extension table horizontally, and push it in the direction of the arrow. (1)
- To remove the extension table, pull it toward the left.
- The inside of the removable extension table can be utilized as an accessory box.
- To open, flip cover down as shown. (2)
Attaching the Presser Foot Shank


Raise the presser bar (a) with the presser foot lifter. Loosen or remove the
presser shank screw. Line up the opening in the shank with the opening on the
presser bar and then tighten the screw. (1)
-
Attaching the presser foot
Lower the presser foot shank (b) using the presser foot lifter, until the cut-
out (c) is directly above the pin (d). (2) The presser foot (f) will engage
automatically. -
Removing the presser foot
Raise the presser foot using the presser foot lifter. (3) Raise the lever (e)
and the foot disengages. -
Attaching the edge/ quilting guide
Attach the edge/ quilting guide (g) in the slot as illustrated. Adjust as
needed for hems, pleats, quilting, etc. (4) -
Attention :
Turn the power switch to off (“O”) when carrying out any of the above
operations!
Needle/ Fabric/ Thread Chart
NEEDLE, FABRIC, THREAD SELECTION GUIDE
| NEEDLE SIZE | FABRICS | ALL PURPOSE THREAD |
|---|
9-11 (70-80)
| Lightweight fabrics-thin cottons, voile, silk, muslin, interlocks, cotton
knits, tricots, jerseys, crepes, woven polyester, shirt & blouse fabrics.|
Thread in cotton, polyester or cotton wrapped polyester.
11-14 (80-90)| Medium weight fabrics-cotton, satin, kettlecloth, sailcloth,
double knits, lightweight woolens.| Most threads sold are all purpose and are
suitable for these fabrics and needle sizes.
Always use the same thread in the upper tension and in the bobbin.
14 (90)| Medium weight fabrics-cotton duck, woolen, heavier knits, terrycloth,
denims.
16 (100)| Heavyweight fabrics-canvas, woolens, outdoor tent and quilted
fabrics, denims, upholstery material (light to medium).
18 (110)| Heavy woolen, overcoat fabrics, upholstery fabrics, some leathers
and vinyls.| Heavy duty thread in the upper tension, all purpose thread in the
bobbin. Set stitch length to 3 or 4.
IMPORTANT: Match needle size to thread size and weight of fabric.
NEEDLE, FABRIC SELECTION
| NEEDLES | EXPLANATION | TYPE OF FABRIC |
|---|---|---|
| SINGER® 2020 | Standard sharp needles. Sizes range thin to large. 9 (70) to 18 | |
| (110). | Natural woven fabrics-wool, cotton, silk, etc. Not recommended for |
double knits.
SINGER® 2045| Semi-ball point needle, scarfed. 9 (70) to 18 (110).| Natural
and synthetic woven fabrics, polyester blends. Knits-polyesters, interlocks,
tricot, single and double knits.
Also sweater knits, Lycra®, swimsuit fabric, elastic.
SINGER® 2032| Leather needles. 12 (80) to 18 (110).| Leather, vinyl,
upholstery. (Leaves smaller hole than standard large needle.)
Note:
- For best sewing results always use genuine SINGER needles.
- Replace needle often (approximately every other garment ) and/ or at first thread breakage or skipped stitches.
How To Drop Feed Dog


For ordinary sewing, keep the feed dogs engaged, for freehand embroidery,
sewing on buttons and darning, drop the feed dogs.
To raise (a) and lower (b) feed dogs. (2)
- To lower feed dogs: Push lever towards position (b). (2)
- To raise feed dogs: Push lever towards position (a). (2). Turn handwheel towards you until you see the feed dogs re-engage.
Inserting & Changing Needles
Change the needle regularly, especially if it is showing signs of wear and
causing problems. For best sewing results always use SINGER needles.
Insert the needle as illustrated as follows:


- A. Loosen the needle clamp screw and tighten again after inserting the new needle. (1)
- B. The flat side of the shaft should be towards the back.
- C/D.Insert the needle as far up as it will go.
Troubleshooting Guide
| Problem | Cause | Correction |
|---|---|---|
| Upper thread breaks | 1. The machine is not threaded correctly. | 1. Rethread |
the machine.
| 2. The thread tension is too tight.| 2. Reduce the thread tension. (lower
number)
| 3. The thread is too thick for the needle.| 3. Select a larger needle.
| 4. The needle is not inserted correctly.| 4. Remove and reinsert the
needle. (flat side towards the back)
| 5. The thread is wound around the spool holder pin.| 5. Remove the reel
and wind thread onto reel.
| 6. The needle is damaged.| 6. Replace the needle.
Lower thread breaks| 1. The bobbin case is not inserted correctly.| 1.
Remove and reinsert the bobbin case and pull on the thread.
| 2. The bobbin case is threaded wrong.| 2. Check both spool and bobbin
case.
Skipped stitches| 1. The needle is not inserted correctly.| 1. Remove and
reinsert needle. (flat side towards the back)
| 2. The needle is damaged.| 2. Insert a new needle.
| 3. The wrong size needle has been used.| 3. Choose a needle to suit the
thread and fabric.
| 4. The foot is not attached correctly.| 4. Check and attach correctly.
Needle breaks| 2. The needle is not correctly inserted.| 2. Insert the
needle correctly. (flat side towards the back)
| 3. Wrong needle size for the fabric.| 3. Choose a needle to suit the
thread and fabric.
| 4. The wrong foot is attached.| 4. Select the correct foot.
Loose stitches| 1. The machine is not correctly threaded.| 1. Check the
threading.
| 2. The bobbin case is not correctly threaded.| 2. Thread the bobbin case
as illustrated.
| 3. Needle/fabric/thread combination is wrong.| 3. The needle size must
suit the fabric and thread.
| 4. Thread tension wrong.| 4. Correct the thread tension.
Seams gather or pucker| 1. The needle is too thick for the fabric.| 1.
Select a finer needle.
| 2. The stitch length is adjusted wrong.| 2. Readjust the stitch length.
| 3. The thread tension is too tight.| 3. Loosen the thread tension.
Uneven stitches, uneven feed| 1. Select a better quality thread.| 1. Select
a better quality thread.
| 2. The bobbin case is threaded wrong.| 2. Remove bobbin case, thread and
insert correctly.
| 3. Fabric has been pulled.| 3. Do not pull on the fabric while sewing, let
the feed dogs pull the fabric under the foot.
The machine is noisy| 1. Lint or oil have collected on the hook or needle
bar.| 1. Clean the hook and feed dog as described.
| 2. The needle is damaged.| 2. Replace the needle.
The machine jams| Thread is caught in the hook because the upper tension is
not threaded correctly.| Remove the upper thread and bobbin case. Gently rock
the handwheel backwards and forwards by hand and remove the thread from the
bobbin area.
Correct Disposal of this product
This marking indicates that this product should not be disposed of with other
household wastes throughout the European Union. To prevent possible harm to
the environment or human health from uncontrolled waste disposal, recycle it
responsibly to promote the sustainable reuse of material resources. To return
your used device, please use the return and collection systems or contact the
retailer where the product was purchased. They can take this product for
environmental safe recycling.
CE – Authorised Representative
VSM Group AB, SVP Worldwide
Drottninggatan 2, SE-56184, Huskvarna, SWEDEN
FAQs
What is the maximum sewing speed of the SINGER 4432 Heavy Duty Sewing Machine?
The SINGER 4432 Heavy Duty Sewing Machine has a maximum sewing speed of 1,100
stitches per minute.
How many built-in stitches are available on the SINGER 4432 Heavy Duty Sewing
Machine?
The SINGER 4432 Heavy Duty Sewing Machine features 32 built-in stitches,
including basic, decorative, and buttonhole stitches.
What type of motor does the SINGER 4432 Heavy Duty Sewing Machine have?
The SINGER 4432 Heavy Duty Sewing Machine is equipped with a powerful motor
that provides 60% more power than standard sewing machines.
What type of needle does the SINGER 4432 Heavy Duty Sewing Machine use?
The SINGER 4432 Heavy Duty Sewing Machine uses standard sewing machine
needles.
What is the weight of the SINGER 4432 Heavy Duty Sewing Machine?
The SINGER 4432 Heavy Duty Sewing Machine weighs approximately 17.42 pounds.
What materials are included with the purchase of the SINGER 4432 Heavy Duty
Sewing Machine?
The SINGER 4432 Heavy Duty Sewing Machine comes with various accessories,
including bobbins, needles, spool caps, a screwdriver, a seam ripper, a lint
brush, and an auxiliary spool pin.
What is the stitch width of the SINGER 4432 Heavy Duty Sewing Machine?
The SINGER 4432 Heavy Duty Sewing Machine offers a maximum stitch width of
6mm.
How many needle positions does the SINGER 4432 Heavy Duty Sewing Machine have?
The SINGER 4432 Heavy Duty Sewing Machine has three needle positions: left,
center, and right.
What type of bobbin system does the SINGER 4432 Heavy Duty Sewing Machine use?
The SINGER 4432 Heavy Duty Sewing Machine uses a top drop-in bobbin system
with a clear cover for easy monitoring of thread supply.
What type of lighting does the SINGER 4432 Heavy Duty Sewing Machine have?
The SINGER 4432 Heavy Duty Sewing Machine is equipped with a built-in LED
light to illuminate the sewing area.
How do you adjust the stitch length on the SINGER 4432 Heavy Duty Sewing
Machine?
The SINGER 4432 Heavy Duty Sewing Machine has a stitch length dial that allows
users to adjust the stitch length up to 4mm.
What is the voltage requirement for the SINGER 4432 Heavy Duty Sewing Machine?
The SINGER 4432 Heavy Duty Sewing Machine operates on 110 volts, making it
suitable for use in North America.
How do you change the needle on the SINGER 4432 Heavy Duty Sewing Machine?
To change the needle on the SINGER 4432 Heavy Duty Sewing Machine, simply
loosen the needle clamp screw, remove the old needle, insert a new needle with
the flat side facing the back, and tighten the screw.
Video-SINGER 4432 Heavy Duty Sewing Machine
Download this Manual:SINGER 4432 Heavy-Duty Sewing Machine Instruction
Manual
Read User Manual Online (PDF format)
Read User Manual Online (PDF format) >>
Download This Manual (PDF format)
Download this manual >>
IMPORTANT SAFETY INSTRUCTIONS
EN
When using an electrical appliance, basic safety should always be
followed, including the following:
Read all instructions before using this sewing machine.
1. An appliance should never be left unattended when plugged in.
2. Always unplug this appliance from the electric outlet immediately
after using and before cleaning.
1. Do not allow to be used as a toy. Close attention is necessary
when this appliance is used by or near children.
2. Use this appliance only for its intended use as described in this
manual. Use only attachments recommended by the
manufacturer as contained in this manual.
3. Never operate this appliance if it has a damaged cord or plug, if it
is not working properly, if it has been dropped or damaged, or
dropped into water. Return the appliance to the nearest
authorized dealer or service center for examination, repair,
electrical or mechanical adjustment.
4. Never operate the appliance with any air openings blocked. Keep
ventilation openings of the sewing machine and foot controller
free from accumulation of lint, dust, and loose cloth.
5. Keep fingers away from all moving parts. Special care is required
around the sewing machine needle.
6. Always use the proper needle plate. The wrong plate can cause
the needle to break.
7. Do not use bent needles.
8. Do not pull or push fabric while stitching. It may deflect the
needle causing it to break.
9. Switch the sewing machine off («O») when making any adjustments
in the needle area, such as threading needle, changing needle,
threading bobbin, or changing presser foot, and the like.
10. Always unplug sewing machine from the electrical outlet when
removing covers, lubricating, or when making any other user
servicing adjustments mentioned in the instruction manual.
11. Never drop or insert any object into any opening.
12. Do not use outdoors.
13. Do not operate where aerosol spray products are being used or
where oxygen is being administered.
14. To disconnect, turn all controls to the off («O») position, then
remove plug from outlet.
15. Do not unplug by pulling on cord. To unplug, grasp the plug, not
the cord.
This sewing machine is intended for household use only.
DANGER
SAVE THESE INSTRUCTIONS
—
To reduce the risk of electric shock:
3.
16. The sound pressure level under normal operating conditions is
75dB(A).
17. Please turn off the machine or unplug when the machine is not
operating properly.
18. Never place anything on the foot controller.
19. If the supply cord that is fixed with foot controller is damaged, it
must be replaced by the manufacturer or its service agent or a
similar qualified person in order to avoid a hazard.
20. This appliance is not intended for use by persons (including
children) with reduced physical, sensory or mental capabilities, or
lack of experience and knowledge, unless they have been given
supervision or instruction concerning use of the appliance by a
person responsible for their safety.
21. Children should be supervised to ensure that they do not play
with the appliance.
The LED lamp maximum power is 0.3W, maximum voltage is DC
9V. If the lamp is damaged, you should not use the product, send
it to SINGER or a service agent to repair or replace at once.
WARNING
—
To reduce the risk of burns, fire,
electric shock, or injury to persons:


