

Adobe Illustrator 2024 предлагает обновленный набор инструментов для создания реалистичных мокапов интерфейсов. Новые feature позволяют быстро визуализировать дизайн-концепции приложений, веб-сайтов и программных продуктов с учетом актуальных тенденций в UI/UX дизайне.
Процесс создания мокапа в Illustrator 2024 строится на использовании умных объектов и сеток. Smart Objects автоматически масштабируют контент без потери качества, а новая система направляющих помогает точно выравнивать элементы интерфейса. Встроенная библиотека компонентов содержит готовые шаблоны для разных типов устройств — от смартфонов до десктопов.
Функция Live Preview позволяет в реальном времени отслеживать, как будет выглядеть create app на разных экранах. Интеграция с Adobe XD и Figma упрощает перенос макетов между программами, сохраняя все стили и параметры объектов. Новые градиенты и эффекты помогают создавать реалистичные тени и отражения на элементах интерфейса.
В версии 2024 появились инструменты для автоматической генерации мокапов на основе исходного дизайна. Достаточно use готовый шаблон и загрузить свой макет — программа сама настроит перспективу, освещение и материалы. Это экономит время при подготовке презентаций для клиентов.
Настройка рабочего пространства и импорт базовых элементов для мокапа
Adobe Illustrator 2024 предлагает специализированное рабочее пространство для создания мокапов. Выберите Window > Workspace > Web для оптимальной компоновки панелей и инструментов.
Базовая настройка нового документа для мокапа:
• Размер: 1920x1080px для десктопа
• Цветовой режим: RGB
• Разрешение: 72 ppi
• Сетка: 8px с привязкой объектов
Импорт элементов через File > Place поддерживает форматы PSD, AI, SVG, PNG. При размещении векторных иконок активируйте feature ‘Create Links’ для возможности быстрого обновления исходников.
Организация слоев мокапа:
• Background (фон и подложки)
• UI Elements (интерфейсные элементы)
• Content (контент-блоки)
• Typography (текстовые элементы)
Для ускорения работы создайте библиотеку UI-компонентов через Window > Libraries > Create New Library. Сохраняйте часто используемые элементы интерфейса как символы через панель Symbols.
Настройка направляющих для app-макета:
• Vertical: 120px отступы по краям
• Horizontal: 80px между секциями
• Smart Guides: включить для точного позиционирования
Активируйте панель Properties для быстрого доступа к параметрам объектов и Assets для управления цветами, стилями и символами проекта.
Создание объемных форм и теней с помощью инструментов градиента
Объемные формы в мокапах приложений создаются через комбинацию линейных и радиальных градиентов. В Adobe Illustrator 2024 для этого используйте панель Gradient (Window > Gradient). При работе над app-интерфейсами настройте угол наклона линейного градиента 45° для реалистичного освещения элементов.
Чтобы create объемную кнопку, примените два градиента: основной — от светлого к темному тону выбранного цвета, дополнительный — белый градиент прозрачности 10-15% сверху для блика. Настройте точки перехода цвета (color stops) на отметках 25% и 75% для плавного перетекания.
Для формирования теней use инструмент Gaussian Blur со значением 5-8px. Создайте копию объекта, переведите в черный цвет с прозрачностью 20% и размещайте под основной формой со смещением 2-4px вправо и вниз. При работе с тенями включите feature Smart Guides (View > Smart Guides) для точного позиционирования.
Глубина interface элементов достигается наложением градиентных сеток. Выделите объект и выберите Object > Create Gradient Mesh. Установите 4-6 точек по горизонтали и вертикали. Настройте цветовые значения узловых точек для создания бликов и затемнений.
При оформлении скругленных элементов применяйте радиальный градиент с центральной точкой, смещенной на 15% влево и вверх от геометрического центра. Это создаст реалистичный эффект падающего света и усилит объемность формы.
Применение текстур и паттернов для реалистичной визуализации материалов
Adobe Illustrator 2024 предлагает расширенные возможности для создания реалистичных текстур. Чтобы добавить материальность мокапу, используйте панель Swatches с готовыми паттернами или создайте собственные через Pattern Maker. При работе с деревом применяйте градиентные сетки с наложением шумовых эффектов через фильтр Grain.
Для имитации ткани create собственный паттерн из пересекающихся линий разной толщины. Настройте прозрачность через панель Transparency и добавьте эффект Scribble для получения текстильной фактуры. Металлические поверхности требуют комбинации зеркальных бликов и микротекстур.
При работе со стеклом и пластиком use наложение полупрозрачных слоев с разными режимами наложения. Через панель Appearance добавьте несколько эффектов: Gaussian Blur для размытия отражений и Inner Glow для создания глубины. В app доступны настройки интенсивности и направления световых бликов.
Для реалистичной передачи кожи и резины примените текстурные кисти с настроенными параметрами нажима и прозрачности. Создайте базовую текстуру через Pattern Maker, затем доработайте её с помощью эффектов Roughen и Distort & Transform для получения естественных неровностей поверхности.
Настройка освещения и бликов для придания объема макету
Работа со светом в Adobe Illustrator 2024 требует понимания физических свойств отражения. Для создания реалистичных бликов используйте инструмент Mesh Tool с настройкой прозрачности узловых точек от 0% до 100%.
Основные правила размещения бликов:
1. Расположите блики на выпуклых частях объекта под углом 45° к источнику света
2. Создайте градацию яркости — центр блика ярче периферии
3. Добавьте вторичные отражения на вогнутых поверхностях
Для усиления объема примените следующие техники:
— Use инструмент Opacity Mask для создания мягких переходов между освещенными участками
— Create несколько слоев с разной прозрачностью для формирования глубины
— Настройте режим наложения Overlay для естественного свечения
Рекомендуемые значения прозрачности:
— Основной блик: 85-100%
— Вторичные отражения: 30-50%
— Рассеянный свет: 15-25%
В app присутствует функция Live Effects, позволяющая динамически корректировать параметры освещения. Активируйте опцию Preserve Transparency для защиты настроек прозрачности при редактировании.
Точная настройка цветовой температуры бликов выполняется через панель Color Guide. Теплые источники света создают желтоватые блики, холодные — голубоватые.
Интеграция фирменного стиля и пользовательского контента в мокап
Для точной визуализации брендинга в Adobe Illustrator 2024 создайте отдельный слой с корпоративными элементами. Разместите логотип, фирменные цвета и шрифты в панели Swatches для быстрого доступа при оформлении мокапа.
Настройте пользовательские библиотеки Creative Cloud Libraries с brand-kit заказчика. Синхронизируйте палитры, паттерны и графические элементы между всеми feature-компонентами app-интерфейса для сохранения единого визуального языка.
При интеграции контента используйте функцию Place Linked для внешних изображений. Это позволит автоматически обновлять материалы при изменении исходников. Сгруппируйте связанные объекты через Smart Objects для удобного масштабирования.
Применяйте инструмент Create Envelope для деформации контента под геометрию мокапа. Настройте параметры искажения через сетку деформации для естественной интеграции изображений на криволинейных поверхностях.
Используйте слои-масски для обрезки контента по форме интерфейсных элементов. Добавьте корректирующие слои Curves и Color Balance для адаптации яркости и контрастности под общую световую схему макета.
Сохраняйте версии мокапа в формате .ai с включенными связями для последующего редактирования контента. Экспортируйте финальные превью в форматах PNG или PDF с высоким разрешением для презентации заказчику.
Подготовка финального файла для презентации и экспорта
Финальный этап работы с мокапом в Adobe Illustrator требует особого внимания к деталям экспорта и презентации. Рассмотрим ключевые шаги подготовки файла:
- Организация слоев для экспорта:
- Группировка связанных элементов в отдельные слои
- Присвоение понятных названий каждому слою
- Удаление скрытых и неиспользуемых объектов
- Проверка технических параметров:
- Конвертация текста в кривые
- Проверка цветового профиля (RGB для экранов, CMYK для печати)
- Настройка разрешения растровых элементов (минимум 300 dpi)
- Форматы сохранения:
- AI-файл с редактируемыми слоями
- PDF для презентации клиенту
- PNG с прозрачностью для веб-использования
- JPG для предпросмотра
Специальные настройки экспорта в Adobe Illustrator 2024:
- Use опции ‘Export for Screens’ для пакетного экспорта
- Активация feature ‘Preserve Appearance’ при сохранении в более ранние версии
- Настройка app-specific параметров для разных устройств
- Создание артбордов разных размеров для различных платформ
Рекомендации по презентации:
- Сохранение версий мокапа под разными углами
- Создание анимированного GIF для демонстрации интерактивности
- Подготовка масштабированных версий для различных носителей
- Формирование превью с реальным контентом заказчика
Комментарии
Interested in learning how to add an image to a mockup in Illustrator? Follow this tutorial and learn how you can achieve this in just a few clicks. You can use any photo and graphic. Let’s begin!
If you don’t have time to make an Adobe Illustrator mockup, you can always try Envato, where you can get unlimited downloads of graphics, photos, fonts, and much more—all ready to be used in your projects.
Step 1
Launch Adobe Illustrator 2024 and go to File > Open. Locate the image on your computer and open it. I am using the Guy in headphones listening to music on smartphone photo to demonstrate this technique.
This is how Illustrator opened my image and, as you can see, the artboard needs to be adjusted. Double-click on the Artboard Tool (Shift-O) to open the Artboard Options window, and set the Height accordingly. In my case, the Height is 950 px.


Step 2
Go to File > Open again and locate the graphic on your computer. It can be any kind of artwork, logo, illustration, or any other vector. I am using the Rap Legend illustration, which looks as if it will work perfectly on the guy’s T-shirt. Once it’s opened, Copy (Control-C) and Paste (Control-V) it into the photo document.
Do not include the background of the illustration.
Scale it down and position it on the T-shirt.


Step 3
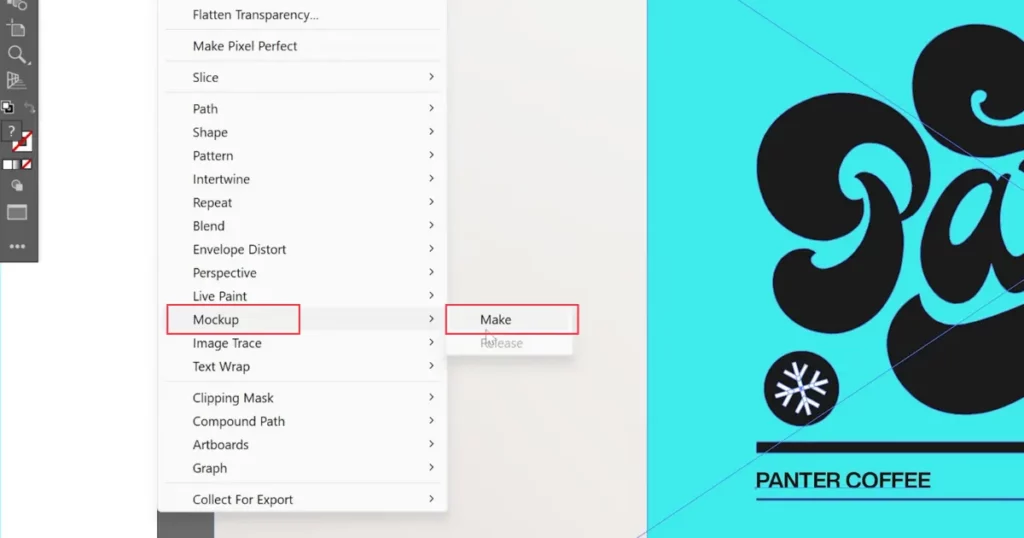
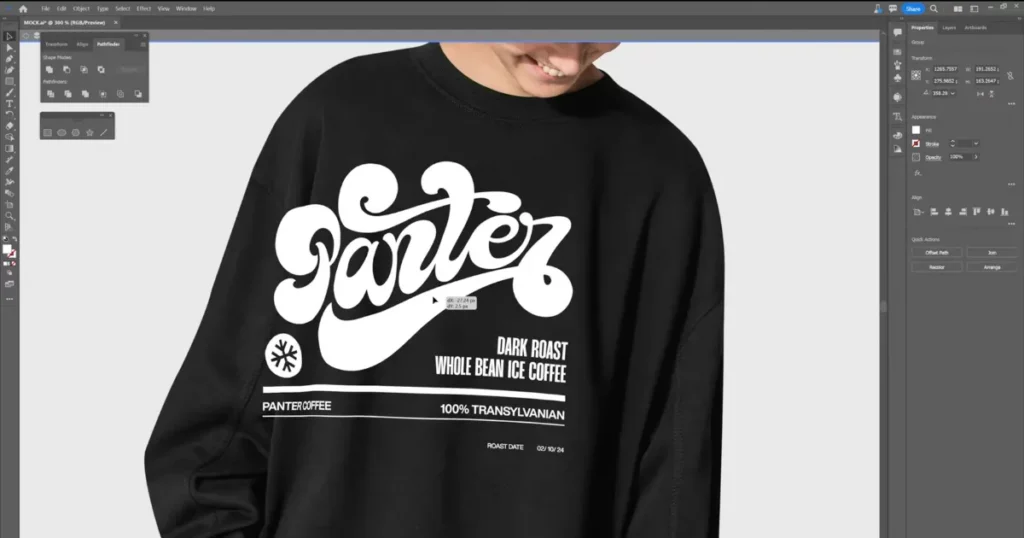
Now, to create the T-shirt mockup, Illustrator has the Mockup feature, which is very easy to use. This works very similarly to how you map graphics to 3D objects.
All you have to do is select your photo and your vector graphic, and go to Object > Mockup > Make. Wait for Illustrator to generate the mesh result. The graphic will turn into a circle that you can move and drag onto the subject’s body, and it will map and adapt to any area. Cool, right?
You can scale it up or down using the Selection Tool (V), holding the Shift key to keep the proportions. Also, rotate the graphic if needed. You get to decide what the final Illustrator mockup will look like.


Step 4
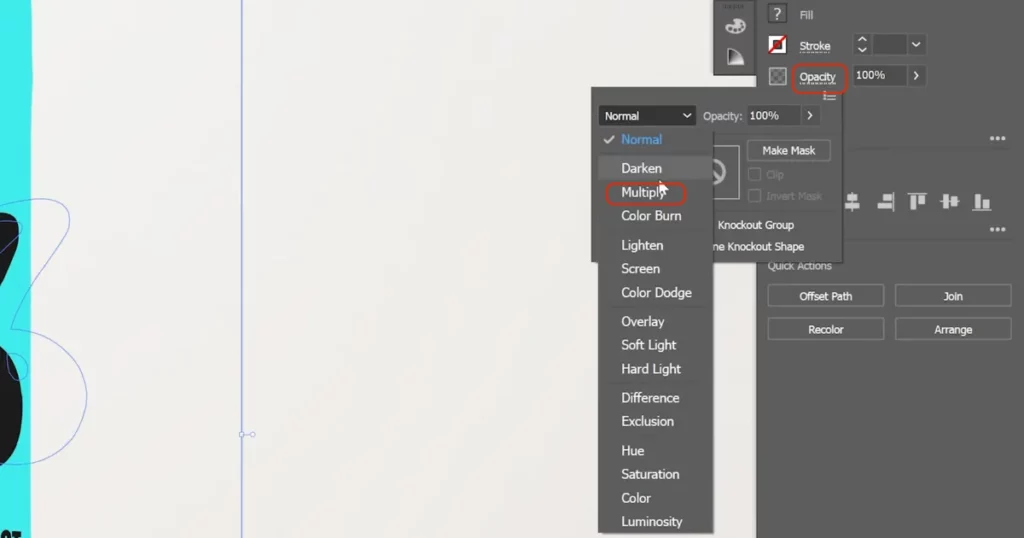
When you’re happy with the position of the graphic, an extra adjustment that you can make is to set the Blending mode to Darken, although in most cases Multiply will work great. I also recommend setting the Opacity to 90% so the graphic blends a little with the texture of the T-shirt.
If you decide to make adjustments later, you can do so. Just double-click on the Mockup group in the Layers panel to enter Isolation mode and select the graphic again. Changes can be made at any time. To exit the Mockup group, double-click anywhere on the workspace.


Congratulations!
Now you know how to add an image to a mockup in Illustrator. Feel free to test this further by using any other graphics and photos. It’s so easy and fast, with an awesome result to showcase.
Make sure to check out Envato, where you will find plenty of resources that might inspire you to create cool designs from graphics, illustrations, logos, typography, Illustrator add-ons, and so much more. Download unlimited creative assets, all ready to use.
Want to Learn More About Adobe Illustrator?
We have loads of tutorials on Envato Tuts+ that teach many other useful techniques. Here is a list of design tutorials specially made for you. Take a look!
Adobe Illustrator has recently introduced a new beta mockup tool that is still undergoing improvements. Despite being in beta mode, the tool is highly capable of completing various tasks. It utilizes Adobe’s AI technology, known as Adobe Sensei.
This tutorial aims to guide graphic designers in using the tool to create professional mockups for their clients.
Let’s start! Make a mockup to impress our clients!
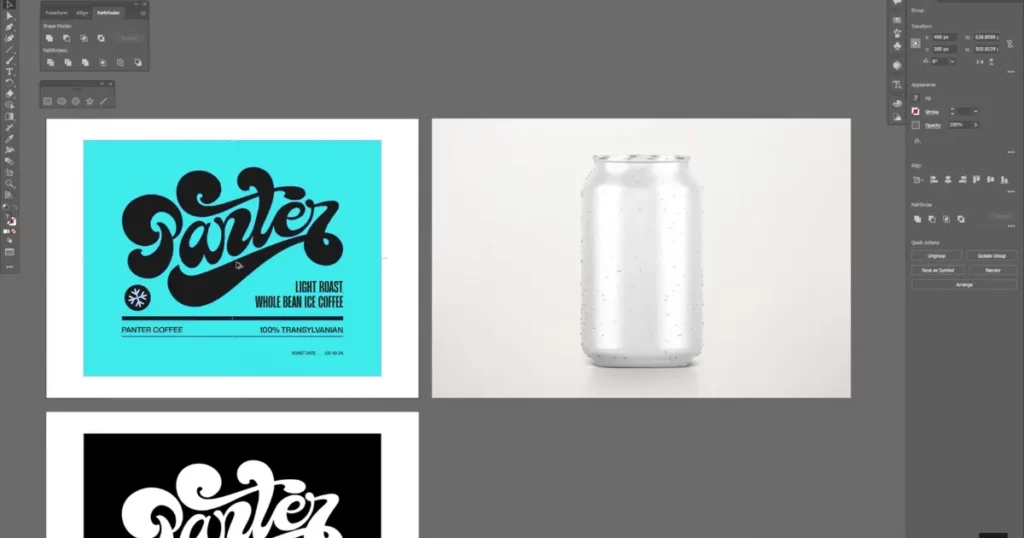
Let’s begin by opening a mockup image in Adobe Illustrator.
Next, place a label graphic or logo design on top of the mockup image.
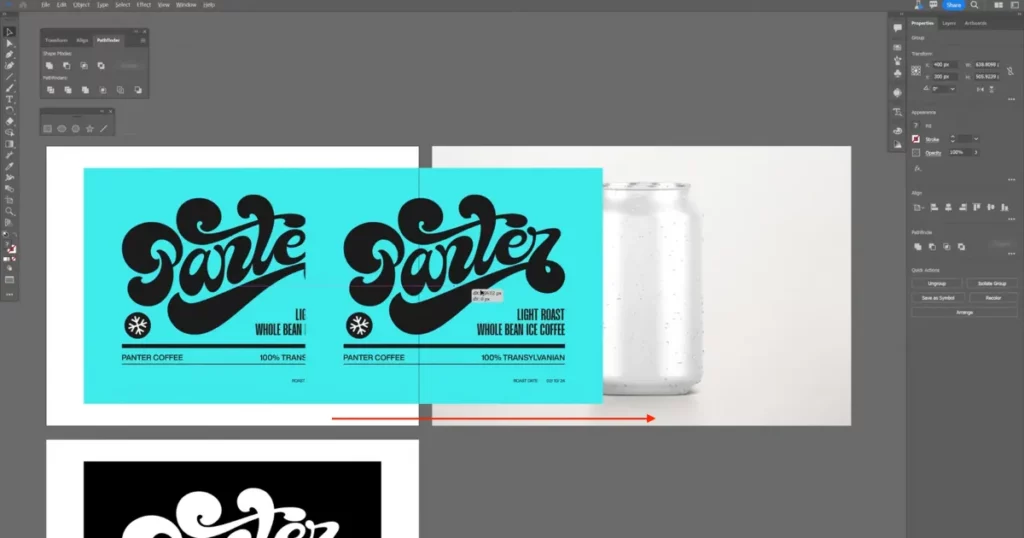
Select the logo to resize and reposition it on the background mockup image as necessary.

If you need to rotate the logo, click on it to select it, and click on the Rotate icon that looks like a double-sided arrow found in the corners. Rotate the logo to your preferred angle if needed.
You can also select the label and move it around if you need to adjust it. Just like we did in the graphic below, but let’s undo that. We do not need these steps for our graphic because it works perfectly for our case. Depending on your graphic, you may have to play with this.

Thanks to Illustrator’s AI capabilities, it can recognize the cup’s cylindrical shape and appropriately adjust the logo to fit perfectly so that you can make realistic mockups for your clients.
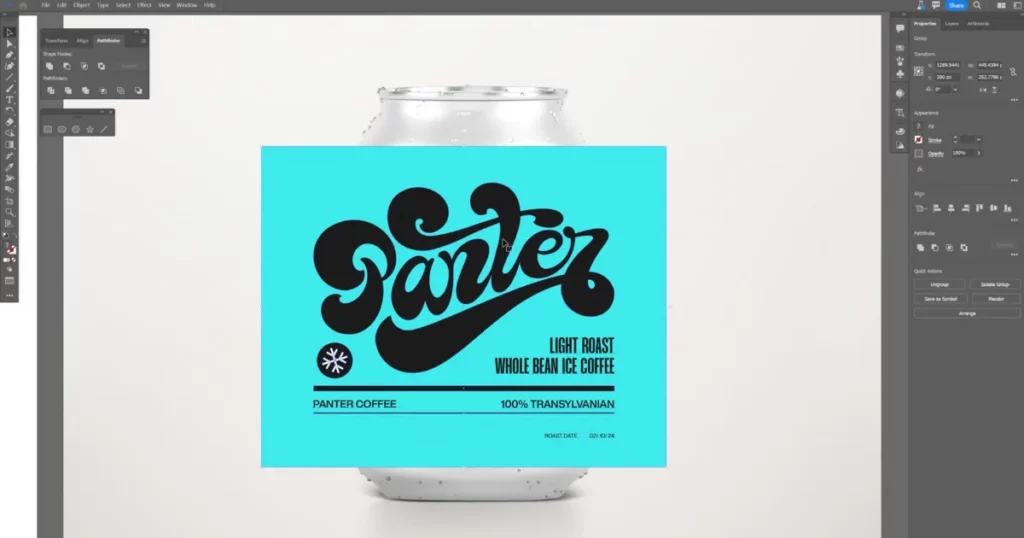
Ok, now let’s continue; please select both images, navigate to Object > Mockup, and click on Make, which will cause Illustrator to wrap the logo on the coffee cup.

Let’s enhance it by adding dramatic and realistic effects by selecting the label design and going to the Transparency panel, changing the blend mode from Normal to Multiply.

It might be necessary to reduce the opacity level slightly in some instances, especially when working with clothing mockups; this will make the clothing texture more visible and realistic.
Play with it and see how it works for you; it will only work with certain types of mockups.
That is all! Now, you have a more authentic mockup with accurate lighting and shadows.

How Do I Release or Edit the Logo on the Mockup?
If you need to undo your mockup and replace your logo, you can go to Object > Mockup > Release.
This will release the logo from the background image, and you can replace it with a different graphic by repeating and reaping the mockup-making process above.
Also, If you need to edit its position, opacity, and blend mode, you can click on the Edit button and make adjustments to your graphic.

The Mockup Panel
Illustrator also includes premade Mockup backgrounds that you can explore.
To do so, go to Window and Mockup to open the Mockup Panel. Here, you get the following categories:
- Apparel
- Branding Graphics
- Digital Devices
- Packaging
We’ll try the Branding Graphics, select the handback sample, and click the Edit on Canvas button.
Illustrator will automatically insert the background mockup image onto the canvas and put our logo on it.
Please note the handbag image is a low-quality version for demo purposes. If we need the high-resolution version, we need to purchase it by clicking on the shopping cart icon.
Next, we can change the blend mode from Normal to Multiply, just like we did with our coffee cup example above.
We will also lower the Transparency level to 97%

Conclusion
In conclusion, Adobe Illustrator’s mockup tool, powered by Adobe Sensei’s AI technology, offers graphic designers a powerful and versatile solution for creating professional mockups.
The tool is highly capable, straightforward to use, and can assist designers in meeting their clients’ needs.
With this tutorial as your guide, you can confidently dive into the world of mockup creation and impress your clients with stunning designs. Get started today and unlock the full potential of Adobe Illustrator’s mockup tool!
More tutorials on Adobe Illustrator
-
- How to Use Generative Shape Fill in Adobe Illustrator
- How to use Generative Recolor in Adobe Illustrator
Learn how to create realistic mockups in Illustrator with this step-by-step guide.
Mockup makes it simple to design top-notch mockups by applying artwork to items such as product packaging, t-shirts, and mugs.
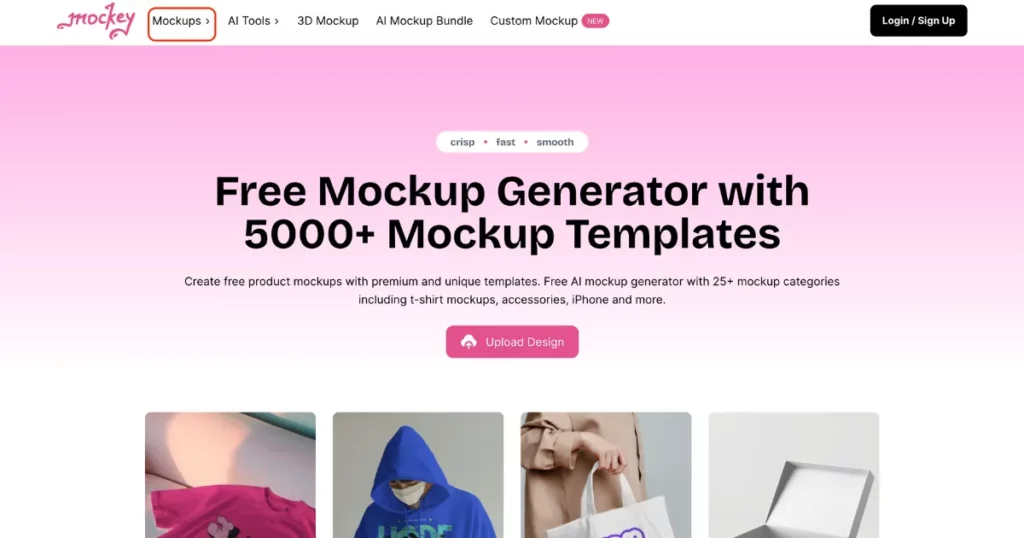
However, looking to create product mockups instantly? Try Mockey AI’s free mockup generator to design and customize stunning mockups in just minutes.
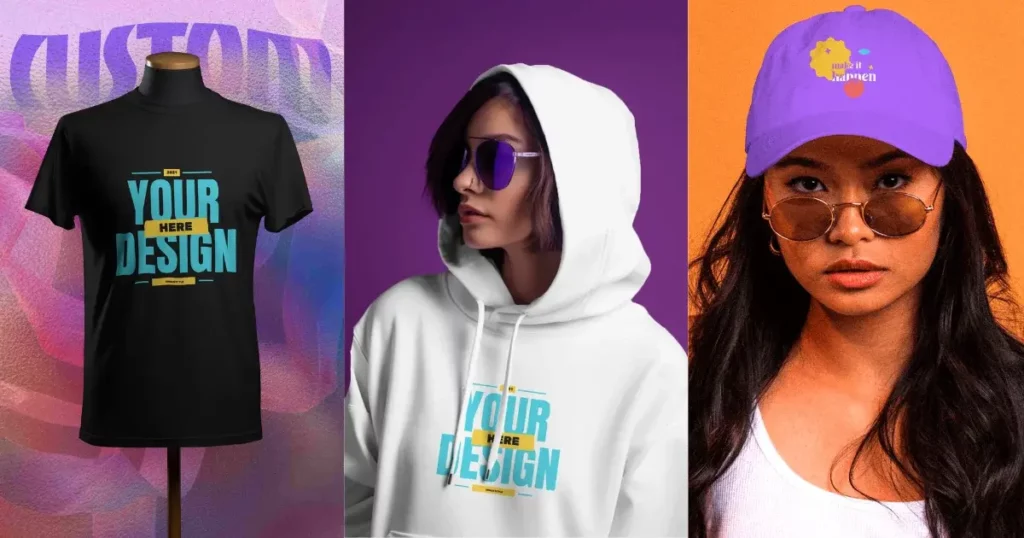
Table of Contents
How to Create Realistic Mockups in Illustrator – Step-By-Step
We recently discovered how to create realistic mockups in Illustrator Beta, and we’re excited to show you how it works. Let’s dive right in!
Step 1: Install Adobe Illustrator Beta
Install Adobe Illustrator beta.
Step 2: Prepare Your Designs
Start with two designs. Drag and drop a blank image.
Next, pick your design and move it over the picture.
Scale the design to fit the mockup properly.
Step 3: Apply the Mockup
Your design and image are now ready. Go to Object > Mockup > Make.
The design will automatically wrap around the mockup image like it’s printed on the object.
Step 4: Adjust the Design’s Transparency
Once applied, you might notice the original design still shows in the image. This happens because the design is flat without shading. To fix it, double-click the design, go to the Opacity settings, and change it from Normal to Multiply.
This will make the design transparent and blend better with the mockup.
Step 5: Adjust the Design’s Position
If you want to reposition the design, double-click it again. The program will automatically adjust the design to match the form of the object—such as a cylinder—so it bends accordingly for a realistic effect.
Step 6: Add a Model to Your Mockup
Now, drag and drop an image of a model wearing a black shirt.
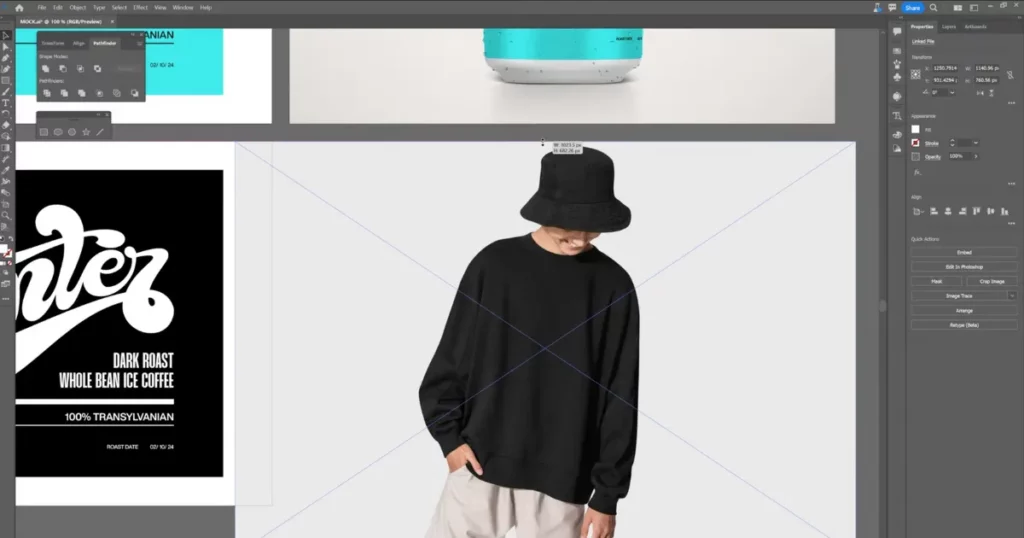
Select only the design (without the background), position it on the model, and scale it to fit.
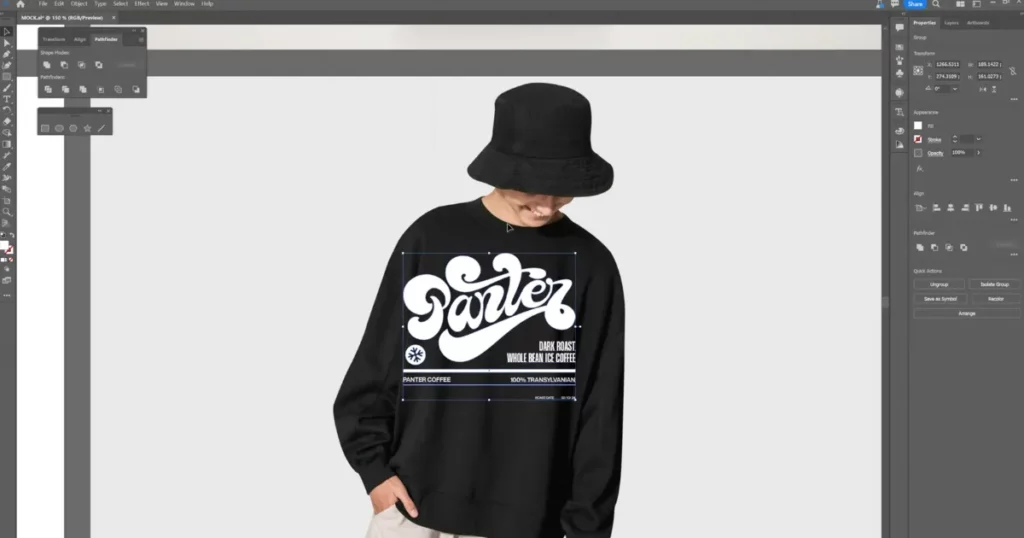
Step 7: Apply the Mockup to the Model
Select both the model and the design, then head to Object > Mockup > Make. The design will wrap around the shirt, and you may need to rotate it slightly to fit perfectly.
Step 8: Release the Design if Needed
Right-click and attempt to release the clipping mask if you must ungroup the design. If there’s no option, simply go to Object > Mockup > Release to remove the design from the mockup.
How to Create Realistic Mockups in Mockey AI?
Mockey AI stands out as the best mockup website for creating realistic mockups, offering an extensive collection of premium templates that you can easily customize.
Follow these steps to create stunning mockups with Mockey AI:
1. Head to Mockey.ai, and sign up there.

2. Click “Mockups” and Choose a template that fits your project, like t-shirts, packaging, or gadgets.
3. Click “Upload Design” and add your image.
4. Customize with color, background, or AI Photoshoot. Adjust angles and placement to make it look natural.
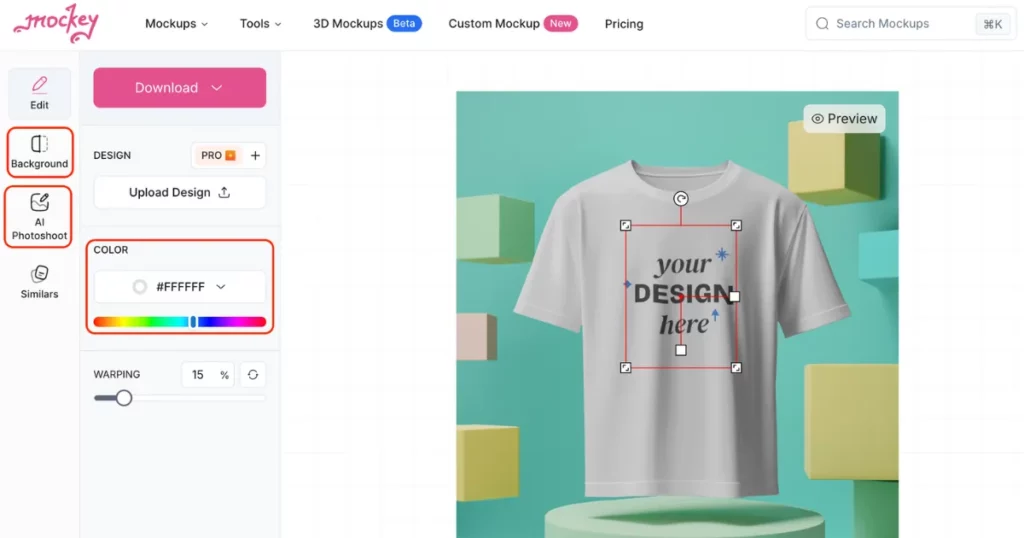
6. Click “Download” to save it as a JPEG file, watermark-free.
Conclusion
Here’s how to create realistic mockups in Illustrator. Experiment with various photos and graphics to refine your design skills—it’s quick, simple, and delivers impressive results that are perfect for showcasing.
Don’t forget to explore Mockey AI, a treasure trove of creative resources! From mockups, 3d mockups, AI tools and product photography, you’ll find endless inspiration. Plus, enjoy unlimited downloads of ready-to-use design assets to elevate your projects.
FAQs
How to create a mockup in Illustrator?
To create a mockup in Illustrator, start by installing the beta version. Drag a blank image, position your design, and use Object > Mock-Up > Make to wrap it. Adjust transparency by setting Opacity to Multiply. To separate designs, use Object > Mock-Up > Release.
How to Make a mockup look realistic?
For a realistic mockup, go to mockey.ai and select Mockups from the menu. Choose the product you wish to customize, upload your image, and personalize it with options like color, background, and an AI-powered photoshoot. Download your mockup free and without a watermark when you’re done.
How do I Make text look realistic in Illustrator?
To make text look realistic in Adobe Illustrator, start by picking a bold font to give it a thicker look. Add shadows and highlights next. Then, use 3D tools to make the text appear more three-dimensional. Finally, adjust the lighting and shadows to make it look even more lifelike.
How to generate a mockup using AI?
Sign up or log in to Mockey.ai to create a mockup. Pick a template from more than 5000 choices, upload your design, and make any changes you want. Finally, you can export your mockup with no watermark.
Is Photoshop or Illustrator better for mockups?
Photoshop and Illustrator are used for creating mockups. Photoshop is great for editing photos and working with detailed images. It’s perfect for mockups that need complex designs. Illustrator, however, is best for making vector graphics that can be resized without losing quality. It also lets you work on multiple designs at once.
What app can I use to Make mockups?
You can use Mockey.ai to create mockups. It has more than 5,000 templates and smart AI tools. You can easily upload your designs, change the templates to fit your needs and download high-quality mockups without any watermarks.
Does Adobe have free mockups?
Adobe gives free mockups on different platforms. You can find free images and vector designs on Adobe Stock by choosing the free filter. Also, Adobe Express has a mockup generator with more than 4,500 templates you can use.
Which version of Illustrator has a mockup?
Adobe Illustrator’s mockup feature is available in the beta version and version 28.0 or newer. This tool helps users combine their vector designs with real photos.
Related reading:
- How to Make a Business Card Mockup in Illustrator
- How to Make 3D Mockup in Illustrator
- How to Remove Background in Illustrator
- 15 Best Adobe Illustrator Alternatives Free and Paid in 2024
Show your vision!
A great way to show the world the product that you visualize with your pattern, is by using mockups.
There are different ways that you can create mockups. But you may have notice that some of them looks realistic, and others, simply don’t.
There are many places to buy high quality mockups, such as Creative Market. They are usually an Adobe Photoshop document with specific layers to place your designs and, just like magic, they adjust in perspective and transparency to look as if the product is already produced.
Adobe offers their programs as a subscription. Which means as long as you pay for the subscription, monthly or yearly, you have access to their programs. You can pay a subscription to all their programs or just pay for one.
In this blog I will be showing you how to create realistic mockups for your surface design patterns only with Adobe Illustrator. Yes, it is possible!
The first thing that you will need to find is a picture of the product that you want to place your art in, with a white surface.
I suggest you avoid search engines such as Google or Bing, to look for your photos. Try websites that offer free images with the photographers’ permission. My favorite is Unsplash because it consistently delivers what I am looking for.
You could also buy a stock photo from Adobe Stock or iStock.
Just make sure that wherever you are getting your photo, you read the license information to know what you are allowed or not allowed to do with that photo.
And of course, you could always take your own photos! You just need a well light place and the product of your preference.
Let’s go step by step to create our mockup in Adobe Illustrator.
1. Search for your image and download it
One of my favorite products to place my surface pattern designs are throw pillows. So, I did a search by “white throw pillow” and found this image by Mediamodifier. Just below the photo you can confirm the license agreement for it.
I always download the image in the “Original Size”. Because once you have something in high quality, you can always export it in a lower quality. But if your image is low quality, you won’t be able to make it better no matter how many tricks you pull out of your pocket.
Also, it is always nice to say thanks to the creator of the image. In my case I do it through Twitter.
2. Place your image in a new document in Adobe Illustrator and lock it.
3. Use the Pen Tool to trace the border of the object that you want your design to be placed in.
You will need to set both your fill and stroke to none and zoom in to be able to see better the border that you are tracing.
4. Select the pattern that you will like to use in your pillow, or any other product, from the swatches.
With your trace selected, and the fill on front, open your swatches panel and select your pattern.
You may need to make some adjustments to your tracing at this point.
5. Adjust the transparency mode of your object.
Select your patten shape and go to the transparency panel. From the dropdown select the mode “multiply”. If you need to, you can also adjust the transparency of the pattern.
You will instantly see how the textures of the white surface shows through the pattern and it looks realistic.
6. Export your image!
That’s it! Just export your image to use in your portfolio, social media, or website!
Must haves…
Creating realistic mockups in Adobe Illustrator is possible. You just need a white surface and some patience.
If you don’t understand how to use the Pen Tool, I have a Skillshare class called «Create Vector Art from Photos: All the Tools to Vectorize in Adobe Illustrator» that teaches you how to use all of the drawing/tracing tools inside Illustrator. If you don’t have a Skillshare account, through that link you can get a 1 month free trial to watch it.
I hope you find this blog helpful. See you around!
This blog is a space to learn about design. I invite you to join my mailing list. This way you will receive a monthly email with my blog post. I respect your privacy and will never share your personal information.