
1
SAFETY INSTRUCTIONS
IMPORTANT TO BE READ AND OBSERVED
Before using the appliance, read these safety
instructions. Keep them nearby for future reference.
These instructions and the appliance itself provide
important safety warnings, to be observed at all times.
The manufacturer declines any liability for failure to
observe these safety instructions, for inappropriate
use of the appliance or incorrect setting of controls.
Very young children (0-3 years) should be kept
away from the appliance. Young children (3-8 years)
should be kept away from the appliance unless
continuously supervised. Children from 8 years
old and above and persons with reduced physical,
sensory or mental capabilities or lack of experience
and knowledge can use this appliance only if they
are supervised or have been given instructions on
safe use and understand the hazards involved.
Children must not play with the appliance. Cleaning
and user maintenance must not be carried out by
children without supervision.
PERMITTED USE
CAUTION: the appliance is not intended to be
operated by means of an external switching device,
such as a timer, or separate remote controlled system.
This appliance is intended to be used in household
and similar applications such as: sta kitchen areas
in shops, oces and other working environments;
farm houses; by clients in hotels, motels, bed
& breakfast and other residential environments.
The maximum number of place settings is shown
in the product sheet.
The door should not be left in the open position
— risk of tripping. The open appliance door can only
support the weight of the loaded rack when pulled out.
Do not rest objects on the door or sit or stand on it.
WARNING: Dishwasher detergents are strongly
alkaline. They can be extremely dangerous if
swallowed. Avoid contact with the skin and eyes and
keep children away from the dishwasher when the
door is open. Check that the detergent receptacle is
empty after completion of the wash cycle.
WARNING: Knives and other utensils with sharp
points must be loaded in the basket with their points
down or placed in a horizontal position — risk of cuts.
This appliance is not for professional use. Do not
use the appliance outdoors. Do not store explosive
or ammable substances (e.g. gasoline or aerosol
cans) inside or near the appliance — risk of re. The
appliance must be used only to wash domestic
dishes in accordance with the instructions in this
manual. The water in the appliance is not potable.
Use only detergent and rinse additives designed
for an automatic dishwasher. When adding salt to
the water softener, run one cycle immediately to
avoid corrosion damage to internal parts. Store the
detergent, rinse aid and salt out of reach of children.
Shut o the water supply and unplug or disconnect the
power before servicing and maintenance. Disconnect
the appliance in the event of any malfunction.
INSTALLATION
The appliance must be handled and installed by
two or more persons — risk of injury. Use protective
gloves to unpack and install — risk of cuts. Connect
the dishwasher to the water mains using only new
hose sets. The old hose sets should not be reused.
All hoses must be securely clamped to prevent them
coming loose during operation. All local waterboard
regulations must be complied with. Water supply
pressure 0.05 — 1.0 MPa. The appliance must be
placed against the wall or built into furniture to limit
the access to its rearside. For dishwashers having
ventilation openings in the base, the openings must
not be obstructed by a carpet.
Installation, including water supply (if any) and
electrical connections, and repairs must be carried
out by a qualied technician. Do not repair or replace
any part of the appliance unless specically stated
in the user manual. Keep children away from the
installation site. After unpacking the appliance, make
sure that it has not been damaged during transport.
In the event of problems, contact the dealer or
your nearest After-sales Service. Once installed,
packaging waste (plastic, styrofoam parts etc.) must
be stored out of reach of children — risk of suocation.
The appliance must be disconnected from the power
supply before any installation operation — risk of
electrical shock. During installation, make sure the
appliance does not damage the power cable — risk of
re or electrical shock. Only activate the appliance
when the installation has been completed.
If installing the dishwasher at the end of a row of
units making the side panel accessible, the hinge
area must be covered to avoid risk of injury. The
inlet water temperature depends on the dishwasher
model. If the installed inlet hose is marked „25°C
Max”, the maximum allowed water temperature is
25°C. For all other models the maximum allowed
water temperature is 60°C. Do not cut hoses and, in
the case of appliances tted with a waterstop system,
do not immerse the plastic casing containing the inlet
hose in water. If hoses are not long enough, contact
your local dealer. Make sure the inlet and drain hoses
are kink-free and are not crushed. Before using the
appliance for the rst time, check the water inlet and
drain hose for leaks. Make sure that the four feet
are stable and resting on the oor, adjusting them as
required, and check that the dishwasher is perfectly
levelled using a spirit level.
Перейти к контенту
Русские электронные инструкции по эксплуатации
Постоянно обновляемый большой каталог документации по эксплуатации и использованию современных устройств и оборудования на русском языке. Бесплатное скачивание файлов.
Поиск:
Главная
♥ В закладки
Просмотр инструкции в pdf
Инструкция по эксплуатации посудомоечной машины Hotpoint-Ariston HFC 3C26 F X.
Скачать инструкцию к посудомоечной машине Hotpoint-Ariston HFC 3C26 F X (5,44 МБ)
Инструкции по эксплуатации посудомоечных машин Hotpoint-Ariston
« Инструкция к стиральной машине Samsung WF8590NLW8DYLP
» Инструкция к посудомоечной машине Korting KDF 45240 S
Вам также может быть интересно
Инструкция к посудомоечной машине Hotpoint-Ariston HSFC 3M19 C

Инструкция к стиральной машине Hotpoint-Ariston NLM 11 724 WC A RU

Инструкция к стиральной машине Hotpoint-Ariston VML 7023 B

Инструкция к стиральной машине Hotpoint-Ariston RPD 1165 DX EU
.jpeg)
Инструкция к газовой варочной панели Hotpoint-Ariston 641 TQG-HA(WH)
Инструкция к стиральной машине Hotpoint-Ariston NLM11 945 WS A RU

Инструкция к стиральной машине Hotpoint-Ariston WMTF 601 L CIS

Инструкция к микроволновой печи Hotpoint-Ariston MWHA 27343 B
Добавить комментарий
Имя *
Email *
Сайт
Комментарий
Сохранить моё имя, email и адрес сайта в этом браузере для последующих моих комментариев.
- Добавить инструкцию
- Заказать инструкцию
- Политика конфиденциальности
|
Код: 131274 Извините, товара сейчас нет в наличии
Бесплатная доставка Извините, товара сейчас нет в наличии Сравнить Услуги:Установка и подключение посудомоечной машины Новости интернет-магазина «Лаукар»:26.02.2025 17.02.2025 10.02.2025 Дополнительная информация в категории Посудомоечная машина:Посудомоечные машины — разбираемся в терминах Таблица Авторизованных сервисных центров по брендам. Описание Инструкция Отзывы (0) В интернет-магазине бытовой техники «Лаукар» Вы можете скачать инструкцию к товару Посудомоечная машина Hotpoint-Ariston HFC 3C26 F совершенно бесплатно. Все инструкции, представленные на сайте интернет-магазина бытовой техники «Лаукар», предоставляются производителем товара. Для того чтобы скачать инструкцию, Вам необходимо нажать на ссылку «скачать инструкцию», расположенную ниже, а в случае, если ссылки нет, Скачать инструкцию Смотреть инструкцию 
Фирма-производитель оставляет за собой право на внесение изменений в конструкцию, дизайн и комплектацию товара: Посудомоечная машина Hotpoint-Ariston HFC 3C26 F. Пожалуйста, сверяйте информацию о товаре с информацией на |
Displayed below is the user manual for HFC 3C26 by Hotpoint which is a product in the Dishwashers category.
This manual has pages.

1
EN
DAILY REFERENCE
GUIDE
THANK YOU FOR BUYING A HOTPOINT- ARISTON
PRODUCT. In order to receive a more complete
assistance, please register your appliance on:
www.hotpoint.eu/register
You can download the Safety Instructions and the Use
and Care Guide, by visiting our website
docs.hotpoint.eu and following the Instructions on the
back of this booklet.
Before using the appliance carefully read Health and Safety guide.
PRODUCT DESCRIPTION
APPLIANCE
1. Upper rack
2. Foldable flaps
3. Upper rack height adjuster
4. Upper spray arm
5. Lower rack
6. Cutlery basket
7. Lower spray arm
8. Filter Assembly
9. Salt reservoir
10. Detergent and Rinse Aid dispensers
11. Rating plate
12. Control panel
0000 000 00000
Service:
1
2
3
4
5
6
10
12
7
11
9
8
CONTROL PANEL
1. On-Off/Reset button with indicator light
2.
Program selection button with indicator light
3.
Zone Wash button with indicator light / Key lock
4.
Eco program indicator light
5. Key lock indicator light
6. Display
7. Program number and remaining time indicator
8.
Tablet ( Tab) indicator light
9. Closed water tap indicator light
10. Rinse Aid refill indicator light
11. Salt refill indicator light
12. Turbo button with indicator light / Tablet (Tab)
13. Delay button with indicator light
14. Start/Pause button with indicator light / Drain out

2
FIRST TIME USE
SALT, RINSE AID AND DETERGENT
ADVICE REGARDING THE FIRST TIME USE
After installation, remove the stoppers from the racks and the retaining
elastic elements from the upper rack.
FILLING THE SALT RESERVOIR
The use of salt prevents the formation of LIMESCALE on the dishes and
on the machine’s functional components.
• It is important that the salt reservoir be never empty.
• It is important to set the water hardness.
The salt reservoir is located in the lower part of the dishwasher (see
PROGRAMS DESCRIPTION) and should be filled when the SALT REFILL
indicator light in the control panel is lit.
1.Remove the lower rack and unscrew the
reservoir cap (anticlockwise).
2.Position the funnel
(see figure)
and fill the salt
reservoir right up to its edge (approximately 1 kg);
it is not unusual for a little water to leak out.
3.Remove the funnel and wipe any salt residue
away from the opening.
Make sure the cap is screwed on tightly, so that no detergent can get
into the container during the wash program (this could damage the
water softener beyond repair).
Whenever you need to add salt, we recommend carrying out the
procedure before the washing cycle is started.
SETTING THE WATER HARDNESS
To allow the water softener to work in a perfect way, it is essential that
the water hardness setting is based on the actual water hardness in
your house. This information can be obtained from your local water
supplier.
The factory setting is for average (3) water hardness.
• Switch on the appliance by pressing the ON/OFF button.
• Switch off the appliance by pressing the ON/OFF button.
• Hold down button START/PAUSE for 5 seconds, until you hear a
beep.
• Switch on the appliance by pressing the ON/OFF button.
•
The current selection level number and the salt indicator light both flash.
• Press button P to select the desired hardness level (see WATER
HARDNESS TABLE).
• Switch off the appliance by pressing the ON/OFF button.
Setting is complete!
As soon as this procedure is complete, run a program without loading.
Only use salt that has been specifically designed for dishwashers.
After the salt has been poured into the machine, the SALT REFILL
indicator light switches off.
If the salt container is not filled, the water softener and the heating
element may be damaged as a result .
FILLING THE RINSE AID DISPENSER
Rinse aid makes dish DRYING easier. The rinse aid dispenser A should
be filled when the RINSE AID REFILL indicator light in the control
panel is lit.
1. Open the dispenser
B
by pressing and pulling up the tab on the lid.
2. Carefully introduce the rinse aid as far as the maximum (110 ml)
reference notch of the filling space — avoid spilling it. If this happens,
clean the spill immediately with a dry cloth.
3. Press the lid down until you hear a click to close it.
NEVER pour the rinse aid directly into the tub.
ADJUSTING THE DOSAGE OF RINSE AID
If you are not completely satisfied with the drying results, you can ad-
just the quantity of rinse aid used.
• Switch the dishwasher on using the ON/OFF button.
• Switch it off using the ON/OFF button.
• Press button
START/PAUSE
three times — a beep will be heard.
• Switch it on using the ON/OFF button.
• The current selection level number and rinse aid indicator light flash.
• Press button P to select the level of rinse aid quantity to be
supplied.
• Switch it off using the ON/OFF button
Setting is complete!
If the rinse aid level is set to 1 (ECO), no rinse aid will be supplied. The
LOW RINSE AID indicator light will not be lit if you run out of rinse aid.
A maximum of 4 levels can be set according to the dishwasher model.
The factory setting is for a medium level.
• If you see bluish streaks on the dishes, set a low number (2-3).
• If there are drops of water or limescale marks on the dishes, set a
high number (4-5).
FILLING THE DETERGENT DISPENSER
To open the detergent dispenser
use the opening device A. Introduce
the detergent into the dry dispenser
B only. Place the amount of
detergent for pre-washing directly
inside the tub.
1.When measuring out the detergent
refer to the
(see PROGRAMS TABLE)
to
add the proper quantity.
Compartment
B
comprises a level
showing the maximum quantity of liquid or powder detergent that
can be added to each cycle.
2. Remove detergent residues from the edges of the dispenser and
close the cover until it clicks.
3. Close the lid of the detergent dispenser by pulling it up until the
closing device is secured in place.
The detergent dispenser automatically opens up at the right time
according to the program. If all-in-one detergents are used, we
recommend using the
TABLET
button, because it adjusts the program so
that the best washing and drying results are always achieved.
Water Hardness Table
Level °dH
German degrees
°fH
French degrees
1 Soft 0 — 6 0 — 10
2 Medium 7 — 11 11 — 20
3 Average 12 — 17 21 — 30
4 Hard 17 — 34 31 — 60
5 Very hard 35 — 50 61 — 90
M
A
X
A
B
35
25
A
B
3
EN
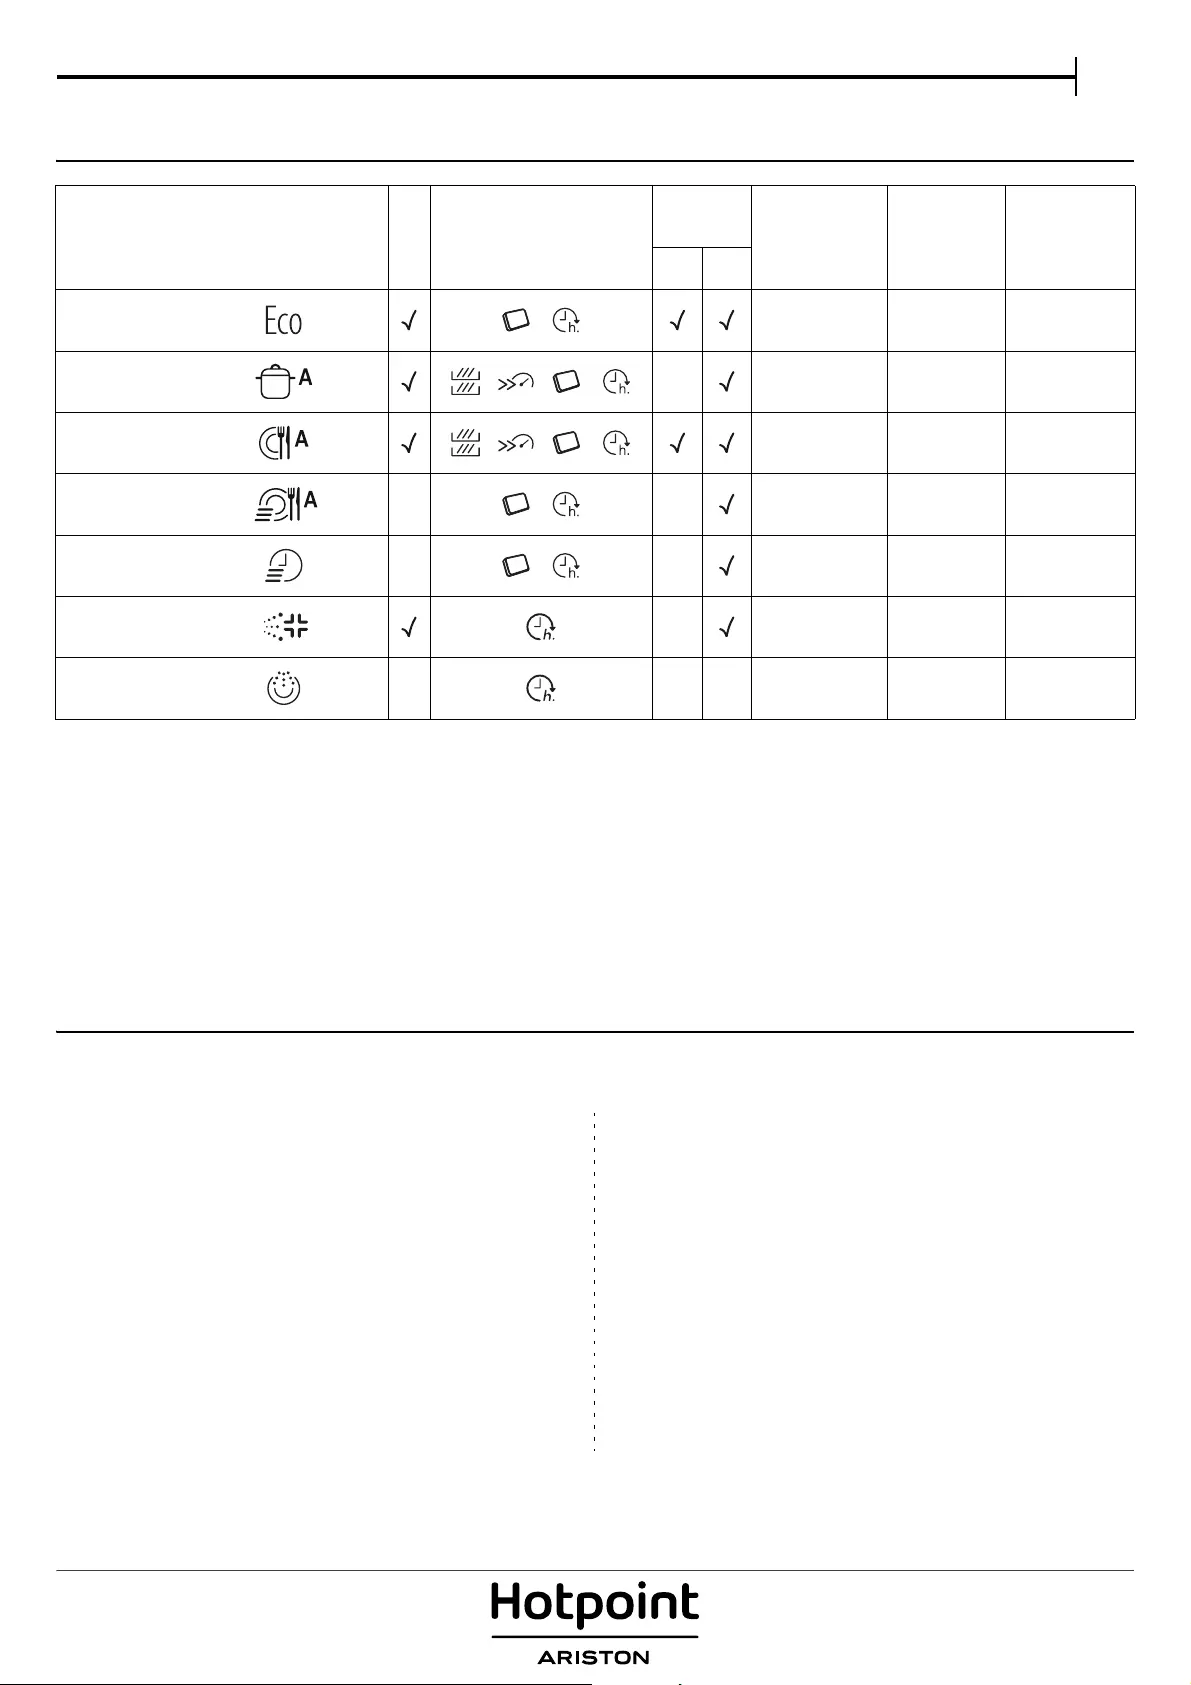
PROGRAMS TABLE
ECO program data is measured under laboratory conditions according to European Standard EN 50242.
*) Not all options can be used simultaneously.
**) The duration of the program shown on the display or in the booklet is an estimate calculated on standard conditions. The actual time may vary
depending on many factors such as temperature and pressure of the incoming water, room temperature, amount of detergent, quantity and type of load,
load balancing, additional selected options and sensor calibration. The sensor calibration can increase program duration up to 20 min.
Standby consumption: Left-on mode consumption: 5 W — Off mode consumption: 0.5 W
Program
Drying
phase
Available options *)
Detergent
container Duration of
wash program
(h:min)**)
Water
consumption
(litres/cycle)
Energy
consumption
(kWh/cycle)
Tub B
1. Eco 50° 3:10 9 0.93
2. Auto Intensive 65° — 2:00 — 3:10 14 — 15.5 1.50 — 1.80
3. Auto Normal 55° 1:30 — 2:30 14.5 — 16 1.15 — 1.30
4. Auto Fast 50° — — 0:40 — 1:20 13 — 14.5 1.15 — 1.25
5. Express 30’ 50° — — 0:30 9 0.50
6. Sanitizing 65° — 1:40 10 1.30
7. Soak — — — — 0:12 4.5 0.01
PROGRAMS DESCRIPTION
Instructions on wash cycle selection.
ECO
Normally soiled crockery. Standard program, the most efficient in terms
of its combined energy and water consumption.
AUTO INTENSIVE
Heavily soiled dishes and pans (not to be used for delicate items).
AUTO NORMAL
Automatic program for normally soiled pans and dishes.
AUTO FAST
Limited quantity of daily soiling (ideal for 4 place settings).
EXPRESS 30’
Program to be used for lightly-soiled dishes with no dried food
residues. (Ideal for 2 place settings).
SANITIZING
Normally or heavily soiled crockery, with additional antibacterial wash.
SOAK
Crockery to be washed later. No detergent to be used with this
program.
Notes:
Optimum performance levels when using the “1 Hour” and “Rapid”
programs can be achieved by observing the maximum amounts of
specified place settings.
To reduce consumption even further, only run the dishwasher
when it is full.
4
OPTIONS AND FUNCTIONS
OPTIONS can be selected directly by pressing the corresponding button (see CONTROL PANEL).
ZONE WASH
This option makes it possible to carry out the wash cycle
in the selected rack only. Select the wash cycle and then
press the ZONE WASH button: the selected rack lights up
and the wash cycle starts in the selected rack only. Press
the button again to deselect the option.
Please refer to the program table to see which cycles are
compatible with this option.
The option is recommended especially with the two
wash cycles: Intensive and Normal.
Select the option and the Intensive cycle to start the
ULTRAINTENSIVE ZONE washing. This wash cycle is ideal
for very soiled mixed loads, e.g. pans and saucepans,
dishes with heavy encrustation or difficult-to-clean
crockery (grater, vegetable mill, dirty cutlery). The
spraying pressure is stronger and the washing
temperature higher, thus ensuring optimum handling of
stubborn stains.
Select the option and the Normal cycle to start the
SAVING ZONE washing. This function makes it possible to
reduce energy consumption. Cycle duration might
change.
Remember to load the crockery in the selected rack
only.
KEYLOCK
A long press (for 3 seconds) of ZONE WASH button, will
activate the KEYLOCK function. The KEYLOCK function
will block the control panel except the ON/OFF button.
To deactivate the KEYLOCK, long press again.
TURBO
This option can be used to reduce the duration of the
main programs while maintaining the same washing and
drying performance levels.
After selecting the program, press the TURBO button and
the indicator light will switch on. To deselect the option,
press the same button again.
TABLET (Tab)
This setting allows you to optimize the performance of
the program according to the type of detergent used.
Press the TURBO button for 3 seconds (the corresponding
symbol will light up) if you use combined detergents in
tablet form (rinse aid, salt and detergent in 1 dose).
If you use powder or liquid detergent, this option
should be off.
DELAY
The start of the program may be delayed for a period of
time between 0:30 and 24 hours.
1.Select the program and any desired options. Press the
DELAY button (repeatedly) to delay the start of the
program. Adjustable from 0:30 to 24 hours. With each
press of the button, the delay start increases by: 0:30 if
selection below 4 hours, 1:00 if selection is below 12
hours, 4 hours if selection is above 12 hours. If 24 hours
reached, and the button is pressed, the delayed start is
deactivated.
2. Press the START/PAUSE button: the timer will begin
counting down;
3. Once this time has elapsed, the indicator light switches
off and the program begins automatically.
If at the time of the countdown the START/PAUSE button
is pressed again the DELAY option is cancelled and the
selected program starts automatically.
The DELAY function cannot be set once a program
has been started.
WATER TAP CLOSED – Alarm
Flashes when there is no inlet water or water tap is closed.
DRAIN OUT
To stop and cancel the active cycle, the Drain Out
function can be used.
A long press of START/PAUSE button, will activate the
DRAIN OUT function. The active program will be stopped
and the water in the dishwasher will be drained out.
If an option is not compatible with the selected program see PROGRAMS TABLE, the corresponding LED flashes rapidly 3 times and beeps
will sound. The option will not be enabled.

5
EN
DAILY USE
1. CHECK WATER CONNECTION
Check that the dishwasher is connected to the water supply and
that the top is open.
2. SWITCH ON THE DISHWASHER
Press the ON/OFF button.
3. LOAD THE RACKS
(see LOADING THE RACKS)
4. FILLING THE DETERGENT DISPENSER
(see PROGRAMS TABLE).
5. CHOOSE THE PROGRAM AND CUSTOMISE THE CYCLE
Select the most appropriate program in accordance with the type
of crockery and its soiling level (see PROGRAMS DESCRIPTION) by
pressing the P button.
Select the desired options (see OPTIONS AND FUNCTIONS).
6. START
Start the wash cycle by pressing the START/PAUSE button. When
the program starts you hear a beep.
7. END OF WASH CYCLE
The end of the wash cycle is indicated by beeps and the display
shows END. Open the door and switch off the appliance by
pressing the ON/OFF button.
Wait for a few minutes before removing the crockery — to avoid
burns.
Unload the racks, beginning with the lower one.
The machine will switch off automatically during certain extended
periods of inactivity, in order to minimise electricity consumption.
If the crockery is only lightly soiled or if it has been rinsed with
water before being placed in the dishwasher, reduce the amount
of detergent used accordingly.
MODIFYING A RUNNING PROGRAM
If a wrong program was selected, it is possible to change it, provided
that it has only just begun: press and hold the ON/OFF button, the
machine will switch off.
Switch the machine back on using the ON/OFF button and select the
new wash cycle and any desired options; start the cycle by pressing the
START/PAUSE button.
ADDING EXTRA CROCKERY
Without switching off the machine, open the door (be ware of HOT
steam!) and place the crockery inside the dishwasher. Close the door
and press the START/PAUSE button the cycle will begin from the point
at which it was interrupted.
ACCIDENTAL INTERRUPTIONS
If the door is opened during the wash cycle, or if there is a power cut,
the cycle stops. Once the door has been closed or the electricity supply
is restored, to start again the cycle from where it was interrupted, press
the START/PAUSE button.
For more information about the functions, you can request or download
from the WEB a Use & Care Guide by following the instructions on the last
page.
ADVICE AND TIPS
TIPS
Before loading the baskets, remove all food residues from the crockery
and empty the glasses. You do not need to rinse beforehand under
running water.
Arrange the crockery so that it is held in place firmly and does not tip
over; and arrange the containers with the openings facing downwards
and the concave/convex parts placed obliquely, thus allowing the
water to reach every surface and flow freely.
Warning: lids, handles, trays and frying pans do not prevent the
sprayer arms from rotating.
Place any small items in the cutlery basket.
Very soiled dishes and pans should be placed in the lower basket
because in this sector the water sprays are stronger and allow a higher
washing performance.
After loading the appliance, make sure that the sprayer arms can rotate
freely.
HYGIENE
To avoid odour and sediment which can be accumulated in the
dishwasher please run a high temperature program at least one a
month. Use a tea spoon of detergent and run it without the loading to
clean your appliance.
UNSUITABLE CROCKERY
• Wooden crockery and cutlery.
• Delicate decorated glasses, artistic handicraft and antique
crockery. Their decorations are not resistant.
• Parts in synthetic material which do not withstand high
temperatures.
• Copper and tin crockery.
• Crockery soiled with ash, wax, lubricating grease or ink.
The colours of glass decorations and aluminium/silver pieces can
change and fade during the washing process. Some types of glass (e.g.
crystal objects) can become opaque after a number of wash cycles too.
DAMAGE TO GLASS AND CROCKERY
• Only use glasses and porcelain guaranteed by the manufacturer as
dishwasher safe.
• Use a delicate detergent suitable for crockery
• Collect glasses and cutlery from the dishwasher as soon as the
wash cycle is over.
6
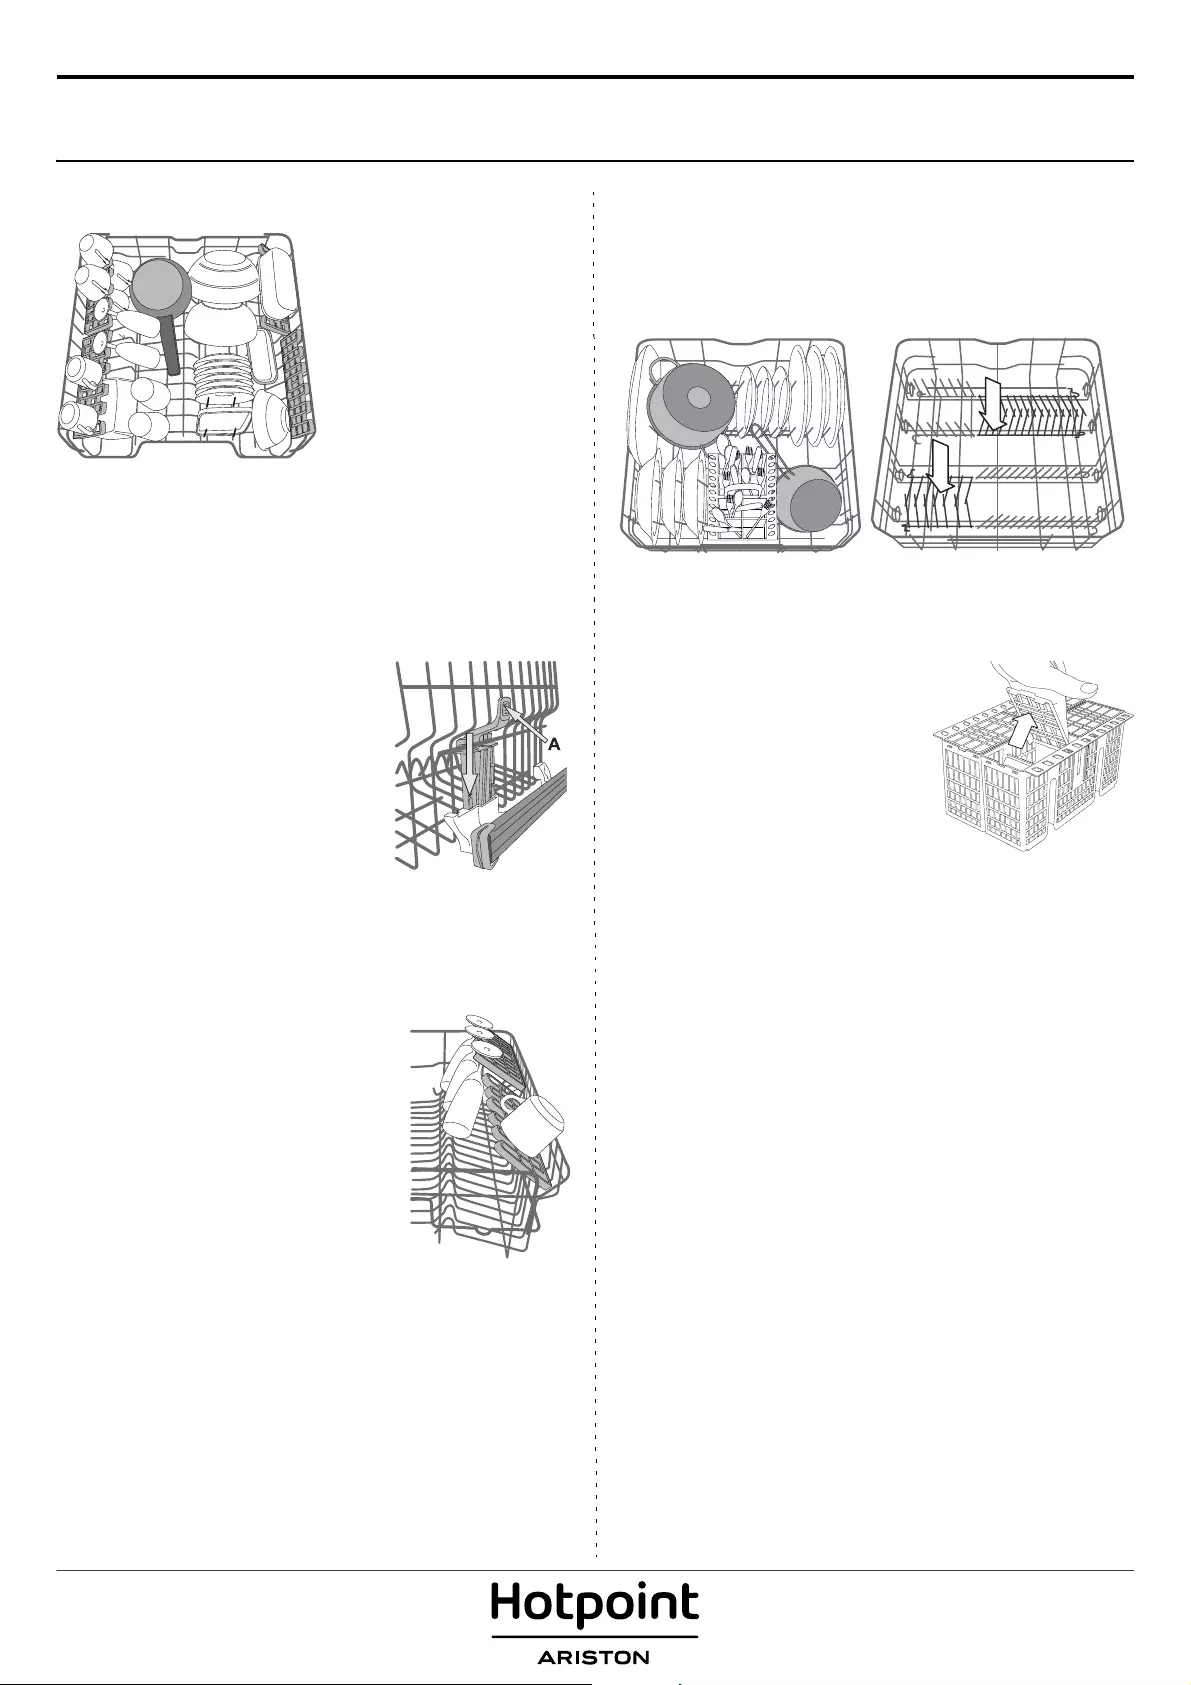
LOADING THE RACKS
UPPER RACK
Load delicate and light dishes:
glasses, cups, saucers, low salad
bowls.
(loading example for the upper rack)
ADJUSTING THE HEIGHT OF THE UPPER RACK
The height of the upper rack can be adjusted: high position to place
bulky crockery in the lower basket and low position to make the most
of the tip-up supports by creating more space upwards and avoid
collision with the items loaded into lower rack.
The upper rack is equipped with a Upper
Rack height adjuster (see figure), without
pressing the levers, lift it up by simply
holding the rack sides, as soon as the rack
is stable in its upper position.
To restore to the lower position, press the
levers A at the sides of the rack and move
the basket downwards.
We strongly recommend that you do
not adjust the height of the rack when it
is loaded.
NEVER raise or lower the basket on one side only.
FOLDABLE FLAPS WITH ADJUSTABLE POSITION
The side foldable flaps can be positioned at
three different heights to optimize the
arrangement of crockery inside the rack.
Wine glasses can be placed safely in the
foldable flaps by inserting the stem of each
glass into the corresponding slots.
For optimum drying results incline the
foldable flaps more. To change the
inclination, pull up the foldable flap, slide it
slightly and position it as you wish.
LOWER RACK
For pots, lids, plates, salad bowls, cutlery etc. Large plates and lids should
ideally be placed at the sides to avoid interferences with the spray arm.
The lower rack has tip-up supports which can be used in a vertical
position when arranging plates or in a horizontal position (lower) to
load pans and salad bowls easily
(loading example for the lower rack).
CUTLERY BASKET
The basket is equipped with top grilles
for improved cutlery arrangement. The
cutlery basket should be positioned only
at the front of the lower rack.
Knives and other utensils with sharp
edges must be placed in the cutlery
basket with the points facing
downwards or they must be
positioned horizontally in the tip-up
compartments on the upper rack.
7
EN
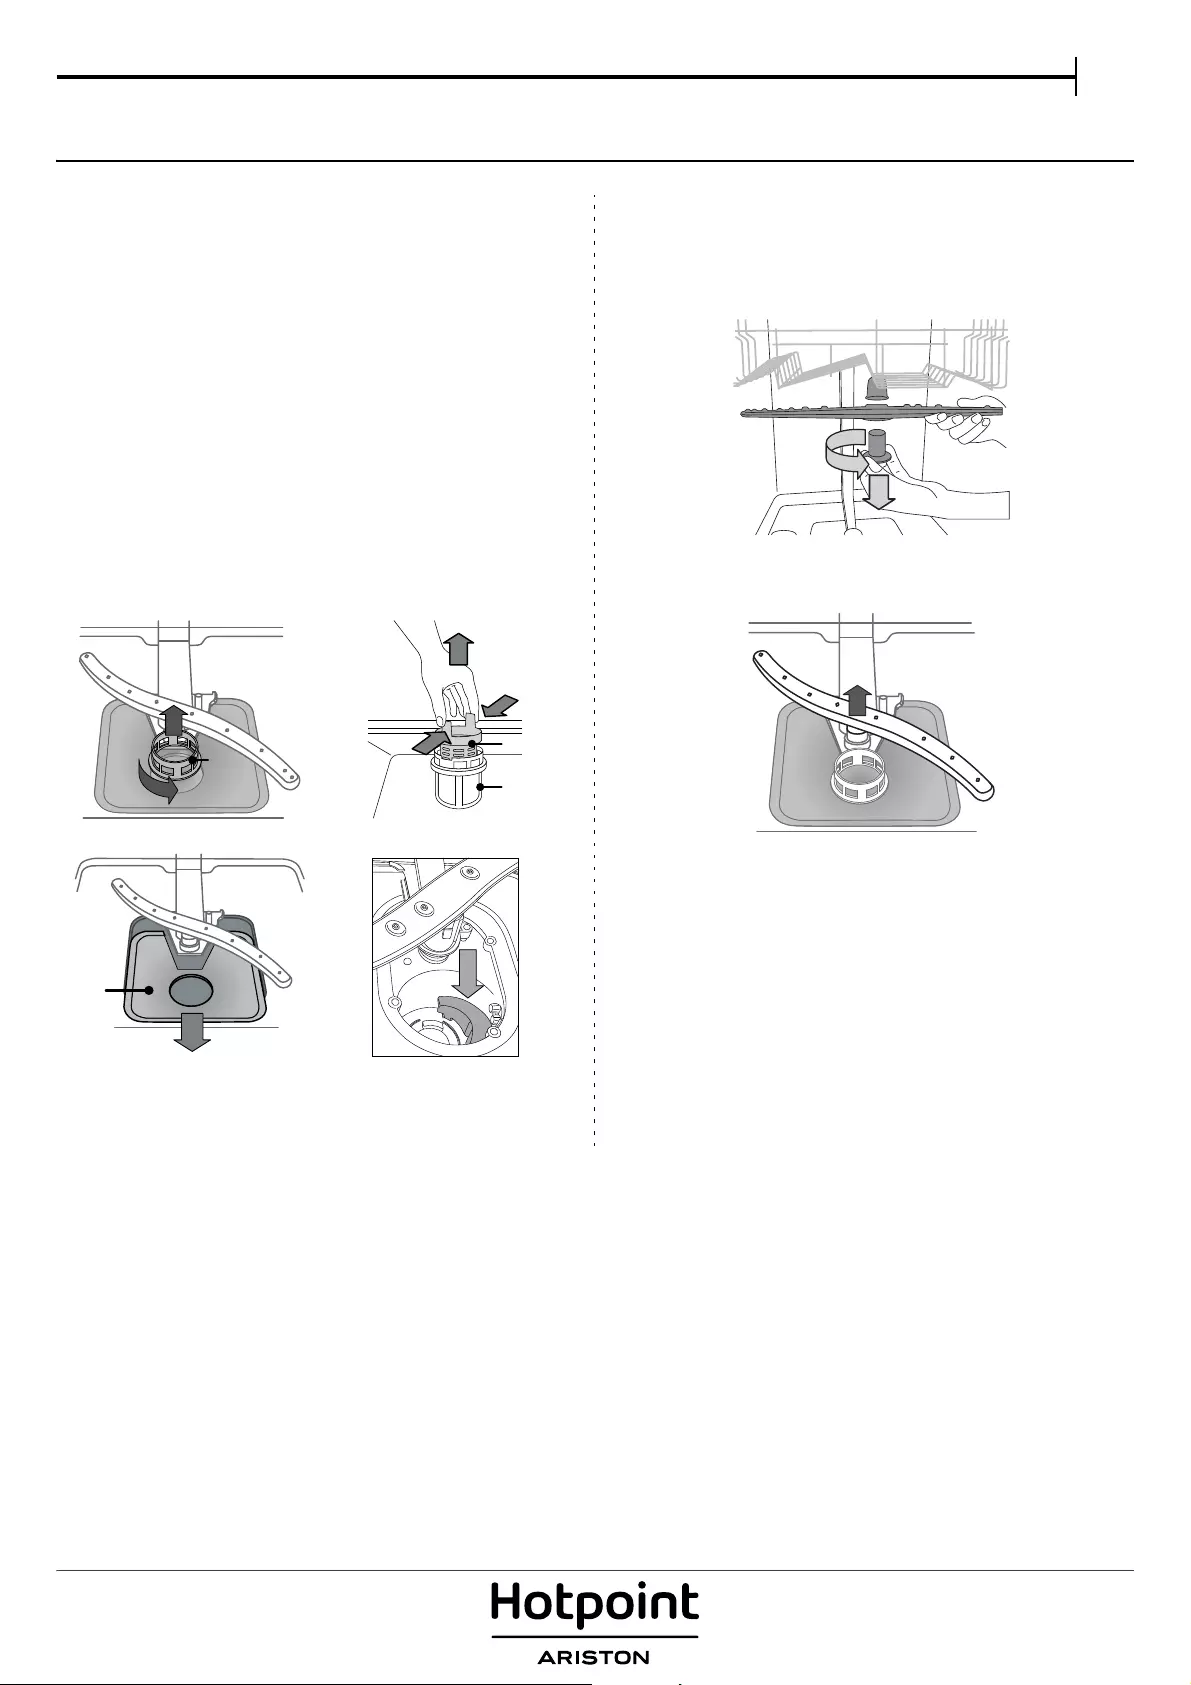
CARE AND MAINTENANCE
CLEANING THE FILTER ASSEMBLY
Regularly clean the filter assembly so that the filters do not clog and
that the waste water flows away correctly.
The filter assembly consists of three filters which remove food residues
from the washing water and then recirculate the water: to obtain the
best washing results, you need to keep them clean.
The dishwasher must not be used without filters or if the filter is
loose.
After several washes, check the filter assembly and if necessary clean it
thoroughly under running water, using a non-metallic brush and
following the instructions below:
1. Turn the cylindrical filter
A
in an anti-clockwise direction and pull it
out
(Fig 1)
.
2. Remove the cup filter
B
by exerting a slight pressure on the side
flaps
(Fig 2)
.
3. Slide out the stainless-steel plate filter
C
(Fig 3)
.
4. Inspect the trap and remove any food residues.
NEVER REMOVE the wash-cycle pump protection (black detail) (Fig 4).
After cleaning the filters, re-place the filter assembly and fix it in
position correctly; this is essential for maintaining the efficient
operation of the dishwasher.
CLEANING THE SPRAY ARMS
On occasions, food residue may become encrusted onto the spray arms
and block the holes used to spray the water. It is therefore
recommended that you check the arms from time to time and clean
them with a small non-metallic brush.
To remove the upper spray arm, turn the plastic locking ring in an anti-
clockwise direction. The upper spray arm should be replaced so that
the side with the greater number of holes is facing upwards.
The lower spray arm may be removed by pulling it upwards.
CLEANING THE WATER INLET HOSE
If the water hoses are new or have not been used for an extended
period of time, let the water run to make sure it is clear and free of
impurities before performing the necessary connections. If this
precaution is not taken, the water inlet could become blocked and
damage the dishwasher.
8
TROUBLESHOOTING
MAINTENANCE AND TROUBLESHOOTING GUIDE
For more information, maintenance procedures and troubleshooting,
see the Use and Care Guide.
The Use and Care Guide can be obtained by:
• After-Sales Service; phone number see in warranty booklet.
• download from website: docs.hotpoint.eu
• use QR code
TECHNICAL DATASHEET
The technical data containing the energy consumption data can be
downloaded from the website: docs.hotpoint.eu
CONTACTING AFTER-SALES SERVICE
When you contact the After-Sales Service,
you must provide the codes shown on
the rating plate attached to the left or
right side inside the door of the
dishwasher. The phone number is listed
in the warranty booklet or on the website:
www.hotpoint.eu
Your dishwasher may not work properly.
Before contacting the Service Centre check if the problem can be solved by going through the following list.
PROBLEMS POSSIBLE CAUSES SOLUTIONS
The dishwasher
won’t start or does
not respond to
commands.
The appliance has not been plugged in
properly.
Insert the plug into the socket.
Power outage. The dishwasher starts automatically when the power returns.
The dishwasher door is not closed. Vigorously push the door until you hear the “click”.
It does not respond to commands. Switch off the appliance by pressing the ON/OFF button, switch it back on
after approximately one minute and reset the program.
The dishwasher
won’t drain.
The wash cycle has not finished yet. Wait until the wash cycle finishes.
The drain hose is bent. Check that the drain hose is not bent (see INSTALATION INSTRUCTION).
The sink drain pipe is blocked. Clean the sink drain pipe.
The filter is clogged up with food residues Clean the filter (see CLEANING THE FILTER ASSEMBLY).
The dishwasher
makes excessive
noise.
The dishes are rattling against each. Arrange the crockery correctly (see LOADING THE RACKS).
An excessive amount of foam has been
produced.
The detergent has not been measured out correctly or it is not suitable for
use in dishwashers (see FILLING THE DETERGENT DISPENSER). Reset dish-
washer by pressing the DRAIN button (see OPTIONS AND FUNCTIONS) and
run new program without detergent.
The dishes are not
clean.
The crockery has not been arranged
properly.
Arrange the crockery correctly (see LOADING THE RACKS).
The spray arms cannot rotate freely,
being hindered by the dishes.
Arrange the crockery correctly (see LOADING THE RACKS).
The wash cycle is too gentle. Select an appropriate wash cycle (see PROGRAMS TABLE).
An excessive amount of foam has been
produced.
The detergent has not been measured out correctly or it is not suitable for
use in dishwashers (see FILLING THE DETERGENT DISPENSER).
The cap on the rinse aid compartment
has not been shut correctly.
Make sure the cap of the rinse aid dispenser is closed.
The filter is soiled or clogged. Clean the filter assembly (see CARE AND MAINTENANCE).
There is no salt. Fill the salt reservoir (see FILLING THE SALT RESERVOIR).
01/2017 as — Xerox Fabriano
ES
1
GUÍA
DE REFERENCIA DIARIA
Antes de usar el electrodoméstico, lea atentamente las Instrucciones de seguridad.APARATO
DESCRIPCIÓN DEL PRODUCTO
PANEL DE CONTROL
GRACIAS POR COMPRAR UN PRODUCTO HOTPOINT
ARISTON. Si desea recibir un servicio más completo, regi—
stre su aparato en: www.hotpoint.eu/register
Puede descargar las Instrucciones de seguridad y el
Manual de usuario, visitando nuestro sitio web
docs.hotpoint.eu y siguiendo las instrucciones de la
parte trasera de este folleto.
1. Botón de Encender-Apagar/Reset con indicador luminoso
2. Botón de Selección de programas con indicador luminoso
3. Botón de Zone Wash con indicador luminoso/ Bloqueo de teclas
4. Indicador luminoso de programa Eco
5. Indicador luminoso de bloqueo de teclas
6. Pantalla
7. Indicador luminoso de número de programa y tiempo restante
8. Indicador luminoso de Pastillas
9. Indicador luminoso de grifo cerrado
10. Indicador luminoso de recarga de abrillantador
11. Indicador luminoso de recarga de sal
12. Botón de Short Time con indicador luminoso / Pastillas
13. Botón de Aplazamiento con indicador luminoso
14. Botón de INICIO/Pausa con indicador luminoso / Vaciado
1. Cesto superior
2. Bandeja para cubiertos
3. Sujeciones plegables
4. Ajustador de altura de la bandeja superior
5. Brazo aspersor superior
6. Cesto inferior
7. Brazo aspersor inferior
8. Conjunto de ltrado
9. Depósito de sal
10. Dispensadores de detergente y abrillantador
11. Placa de características
12. Panel de control
1
4
5
6
7
12
10
8
3
9
0000 000 00000
Service:
11
3
1
2
8
13
14
5
4
6
7 11 12
9
10